Let’s Nip Harvest In the Bud!!
Part One

I realized I had quite a bit to share, oh, 7 pages in. So, we’ll make this a two parter. This is juicy information yo! I have found what has granted me awesome results year after year, while growing with integrity for the plant & the earth, while also being physically possible for me & light on my bank account!
As soon as the calendar flips from July to August, in my area in Northern California, the outdoor grown cannabis begins to bloom. The long days begin to shorten, signaling that it is time to flower. Cannabis is a photoperiod plant. Meaning, they are able to sense changes in the night length, in this case, night becoming longer. When growing cannabis indoors, we would manually make this shift, changing the light cycle from the vegetative schedule of 18/6 to a flowering schedule of 12/12. (12 hours of light & 12 hours of night)
I’ve noticed a pattern strike new growers in the second half of the season that makes me sad. Not planning properly for flowering & harvest. It reminds me of having a baby. You spend 9 months pregnant, reading books about being pregnant, friends sharing stories about pregnancy, all of hte pregnancy info is flowing. And then you have the baby. And suddenly, you feel like Make sure you are planning & preparing for how you will finish off the season ahead of time. Not having a plan is the worst plan of all. It’s time to be proactive vs. reactive.
5 things that will ensure harvest success:
- Support – No Broken Branches!
- Nutrients – Bloom Targeted Plant Food
- IPM – Prohibit Pests, Disease & Fungus Until Harvest
- Drying Space – Safely & Slowly Dry Harvested Flowers
- Storage & Curing – Storing & Aging Your Buds for Optimal Results – Like Fine Wine!
Support Your Girls
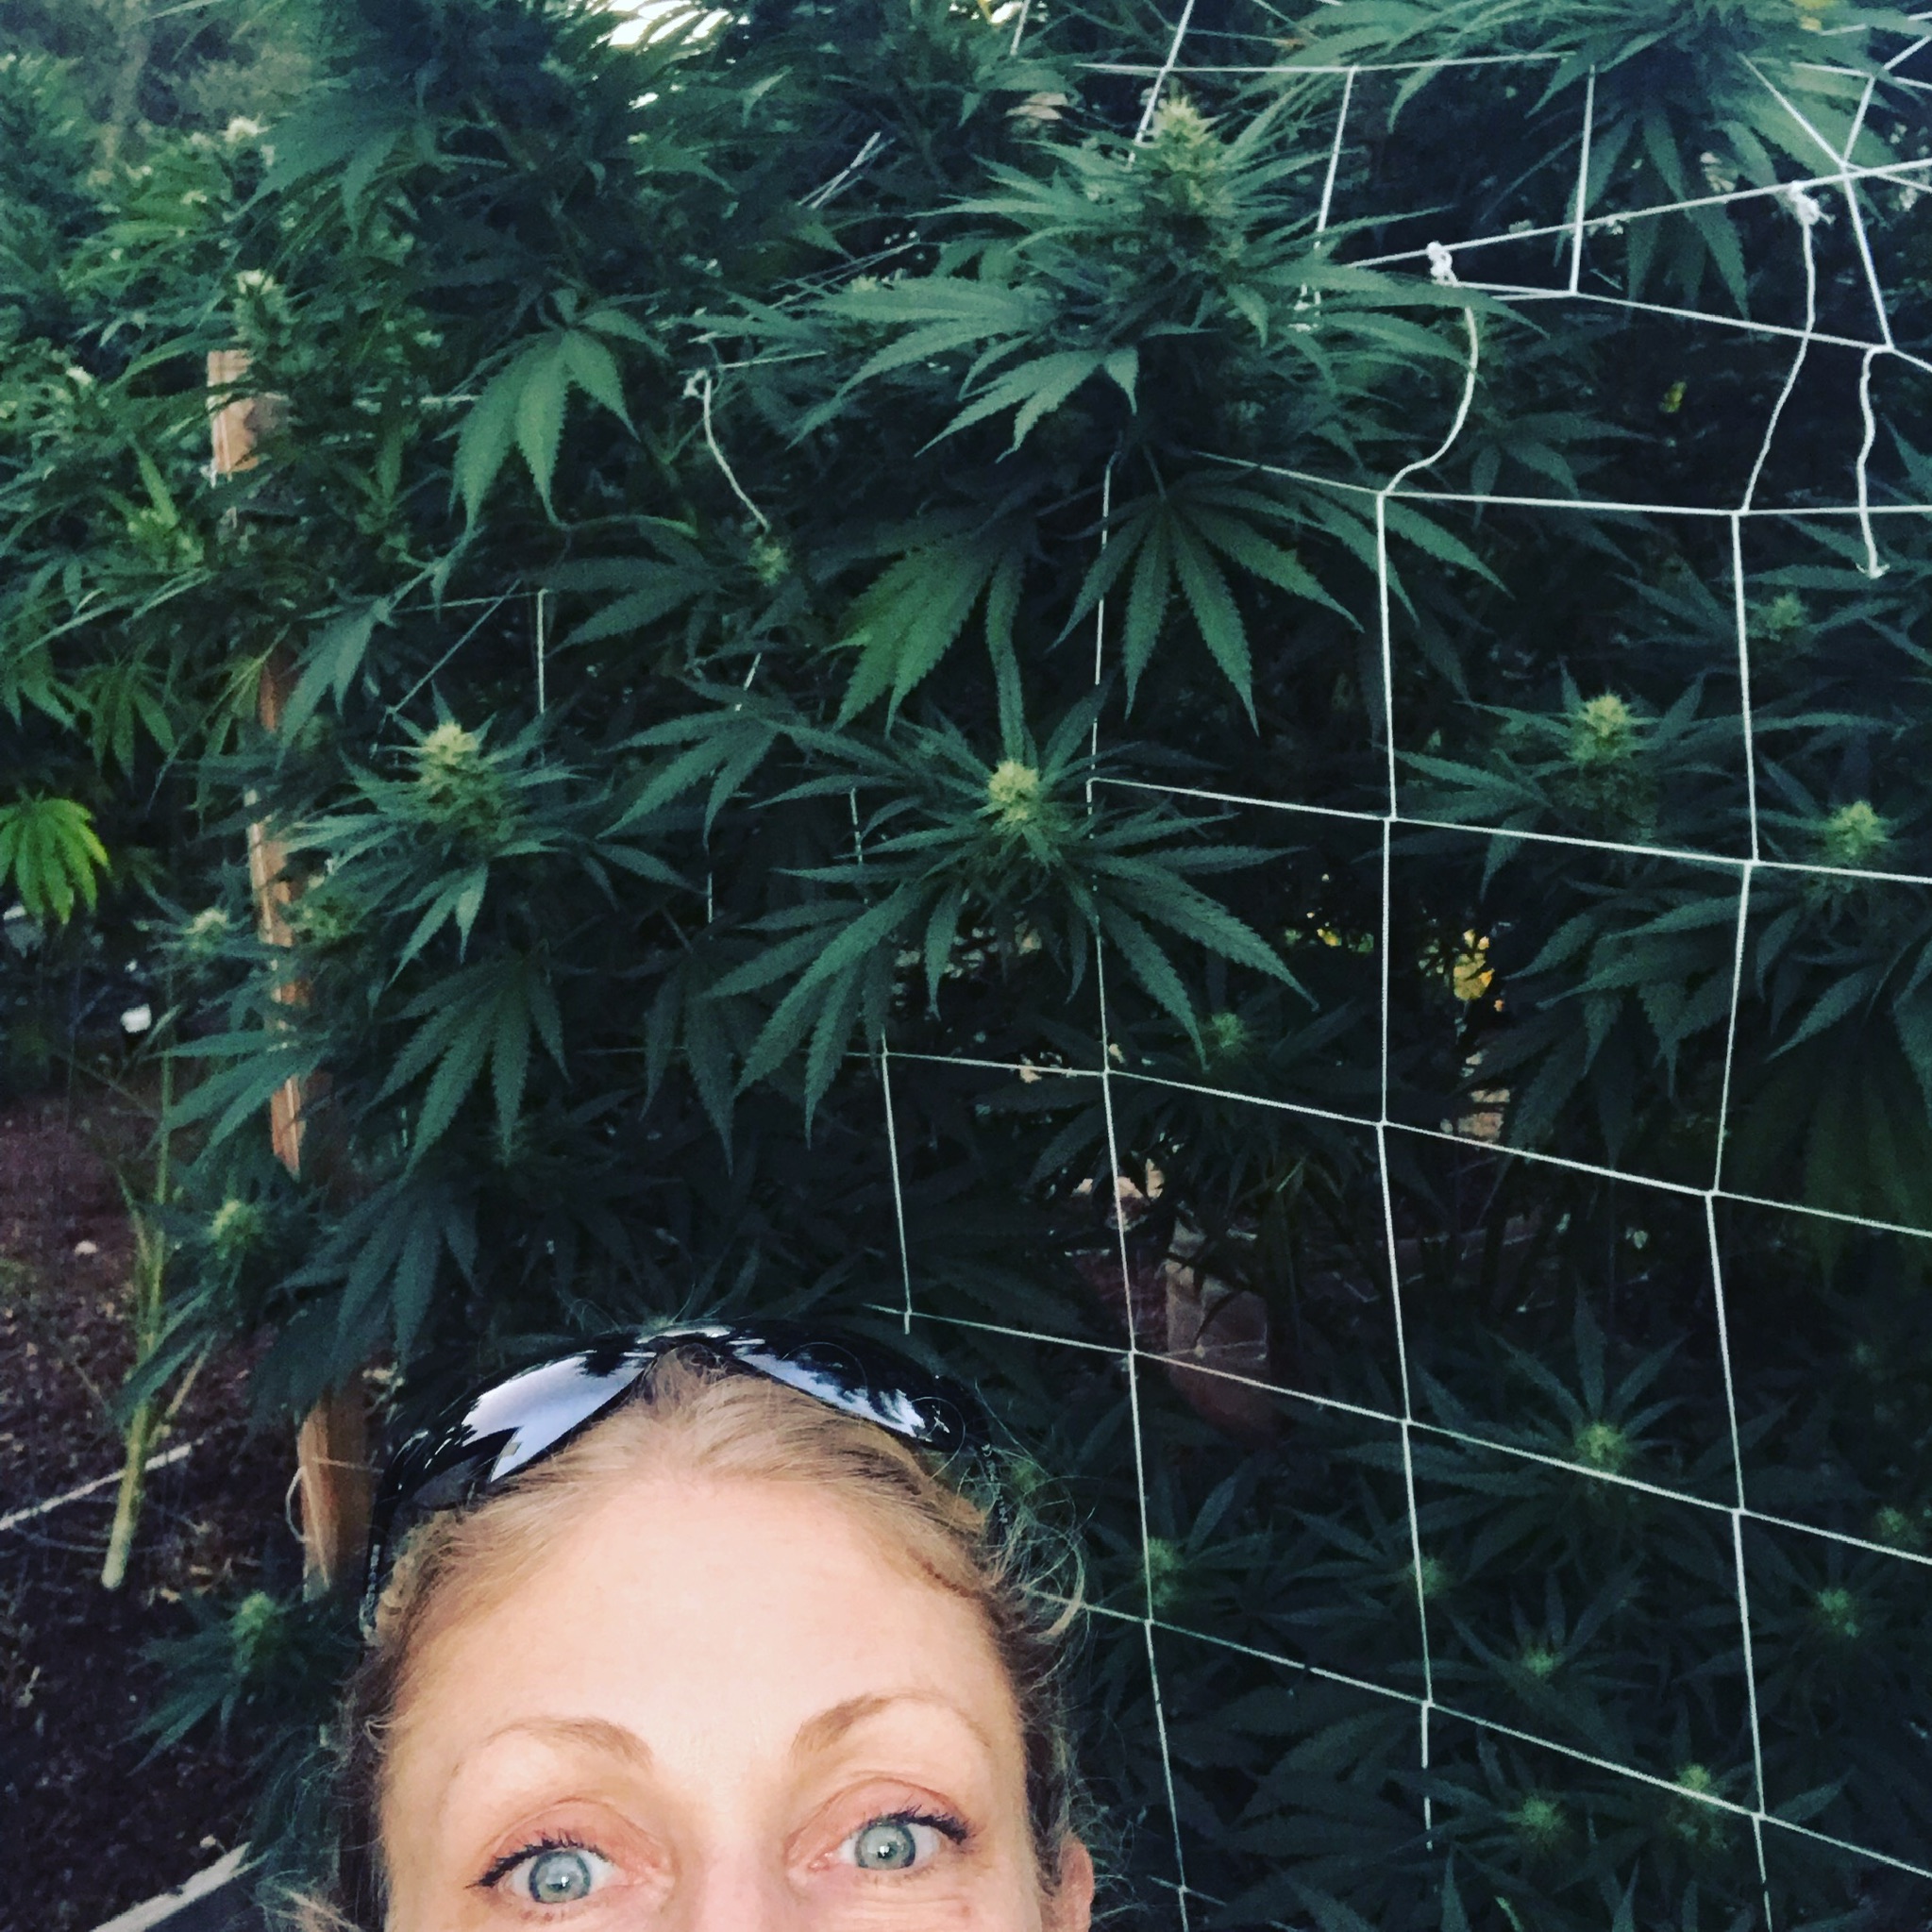
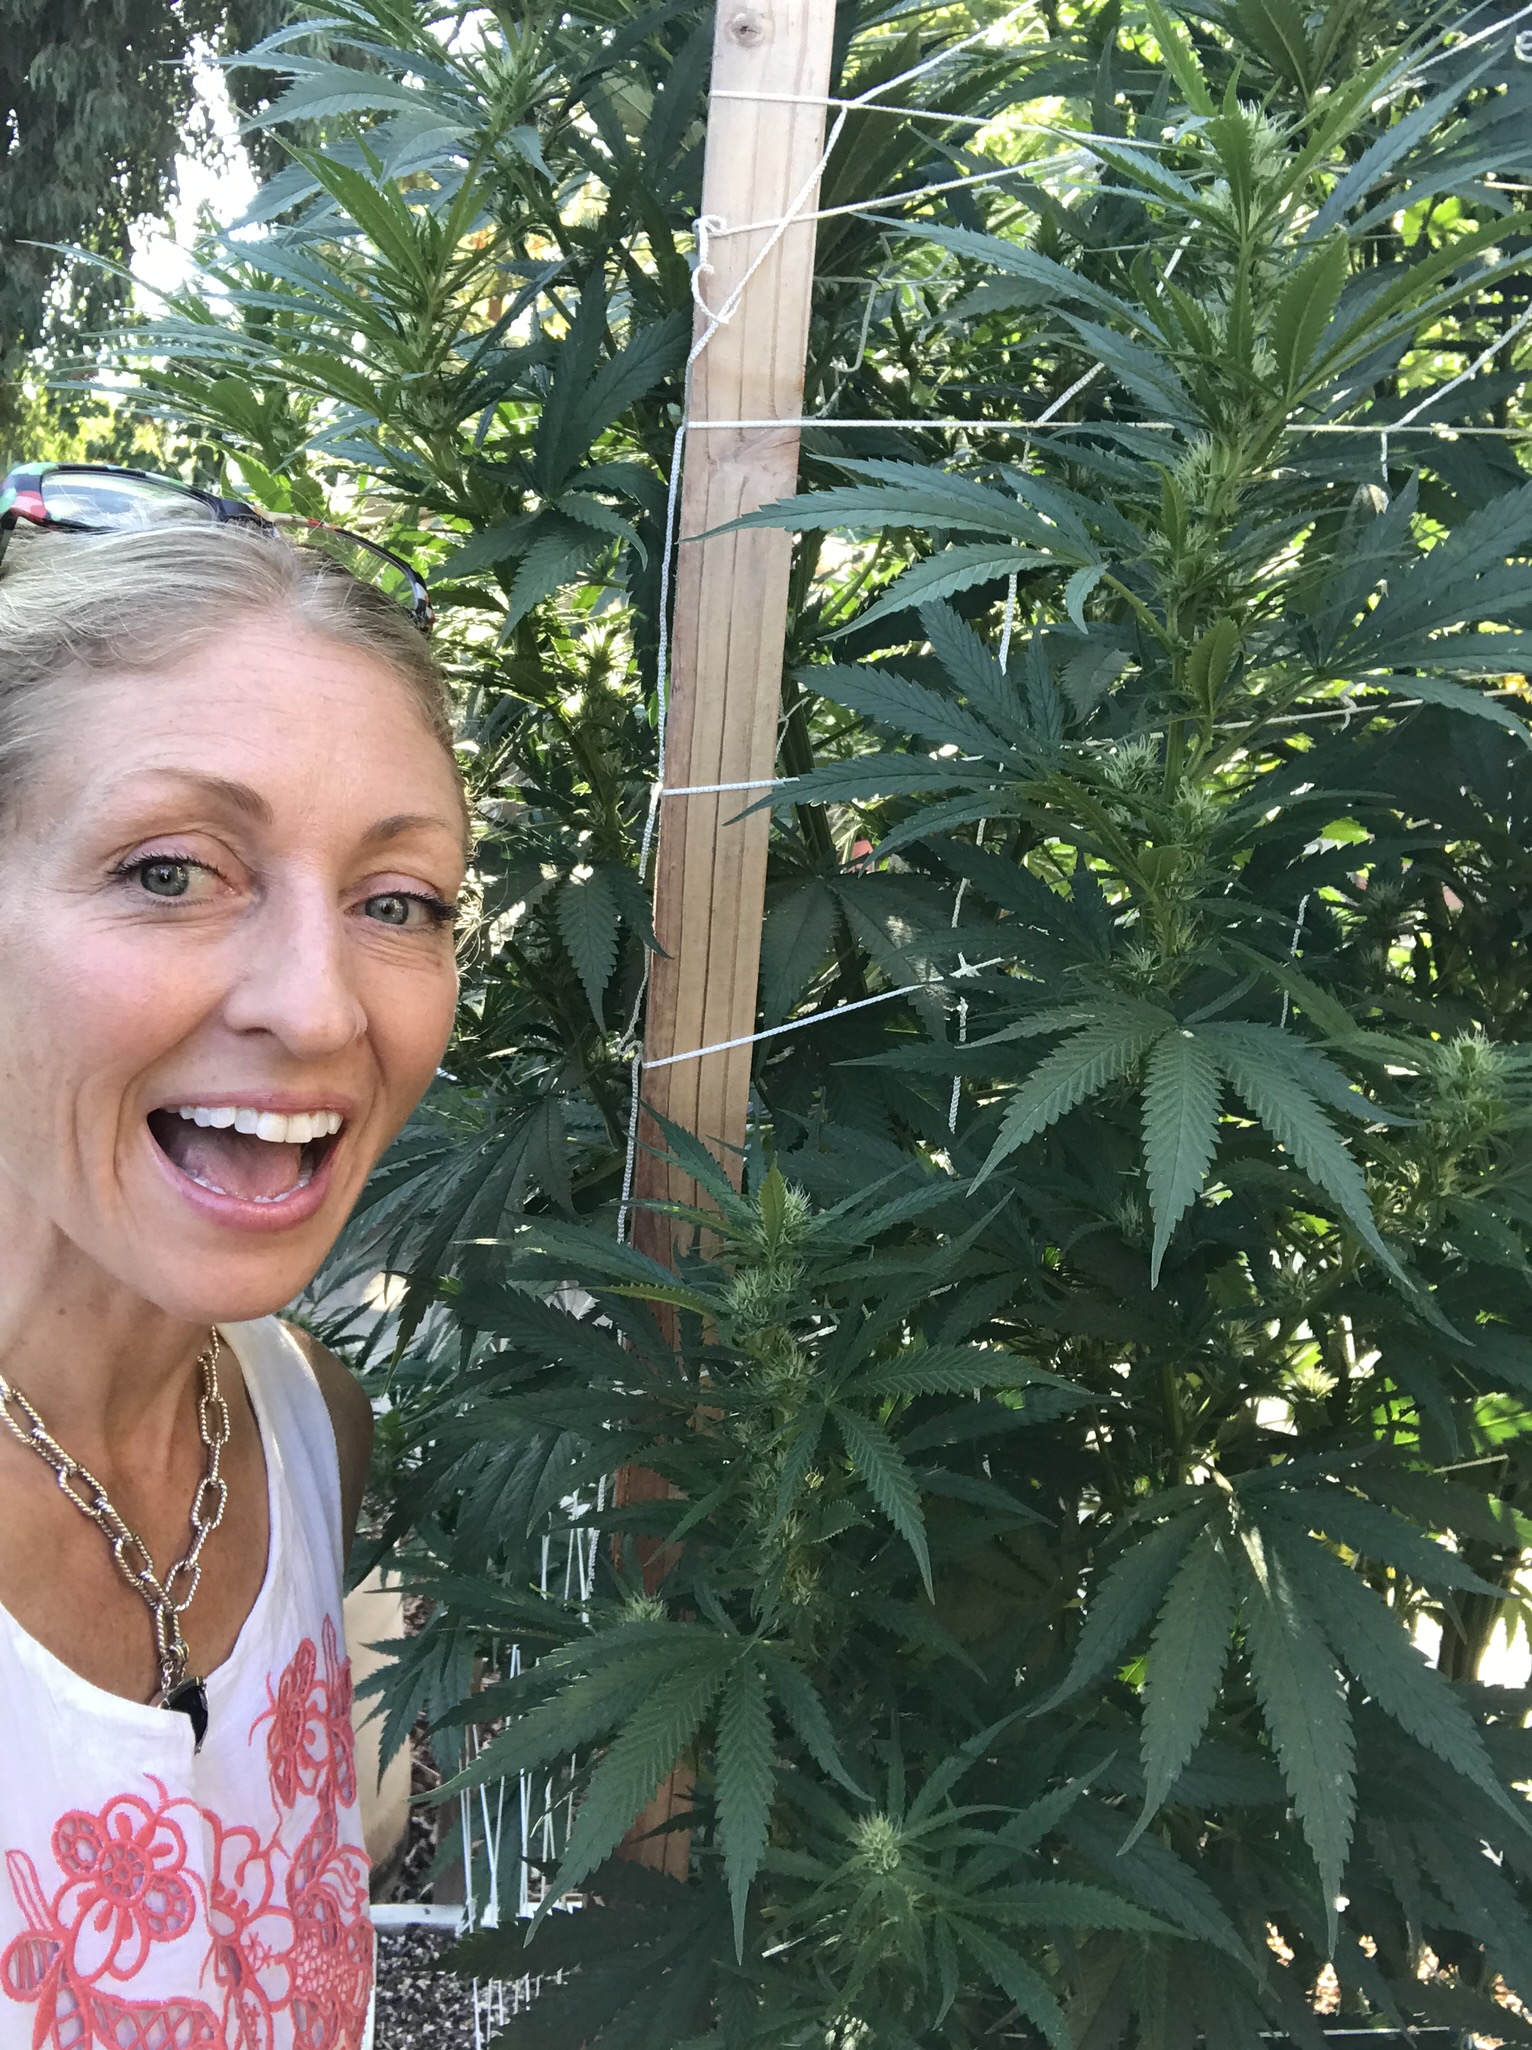
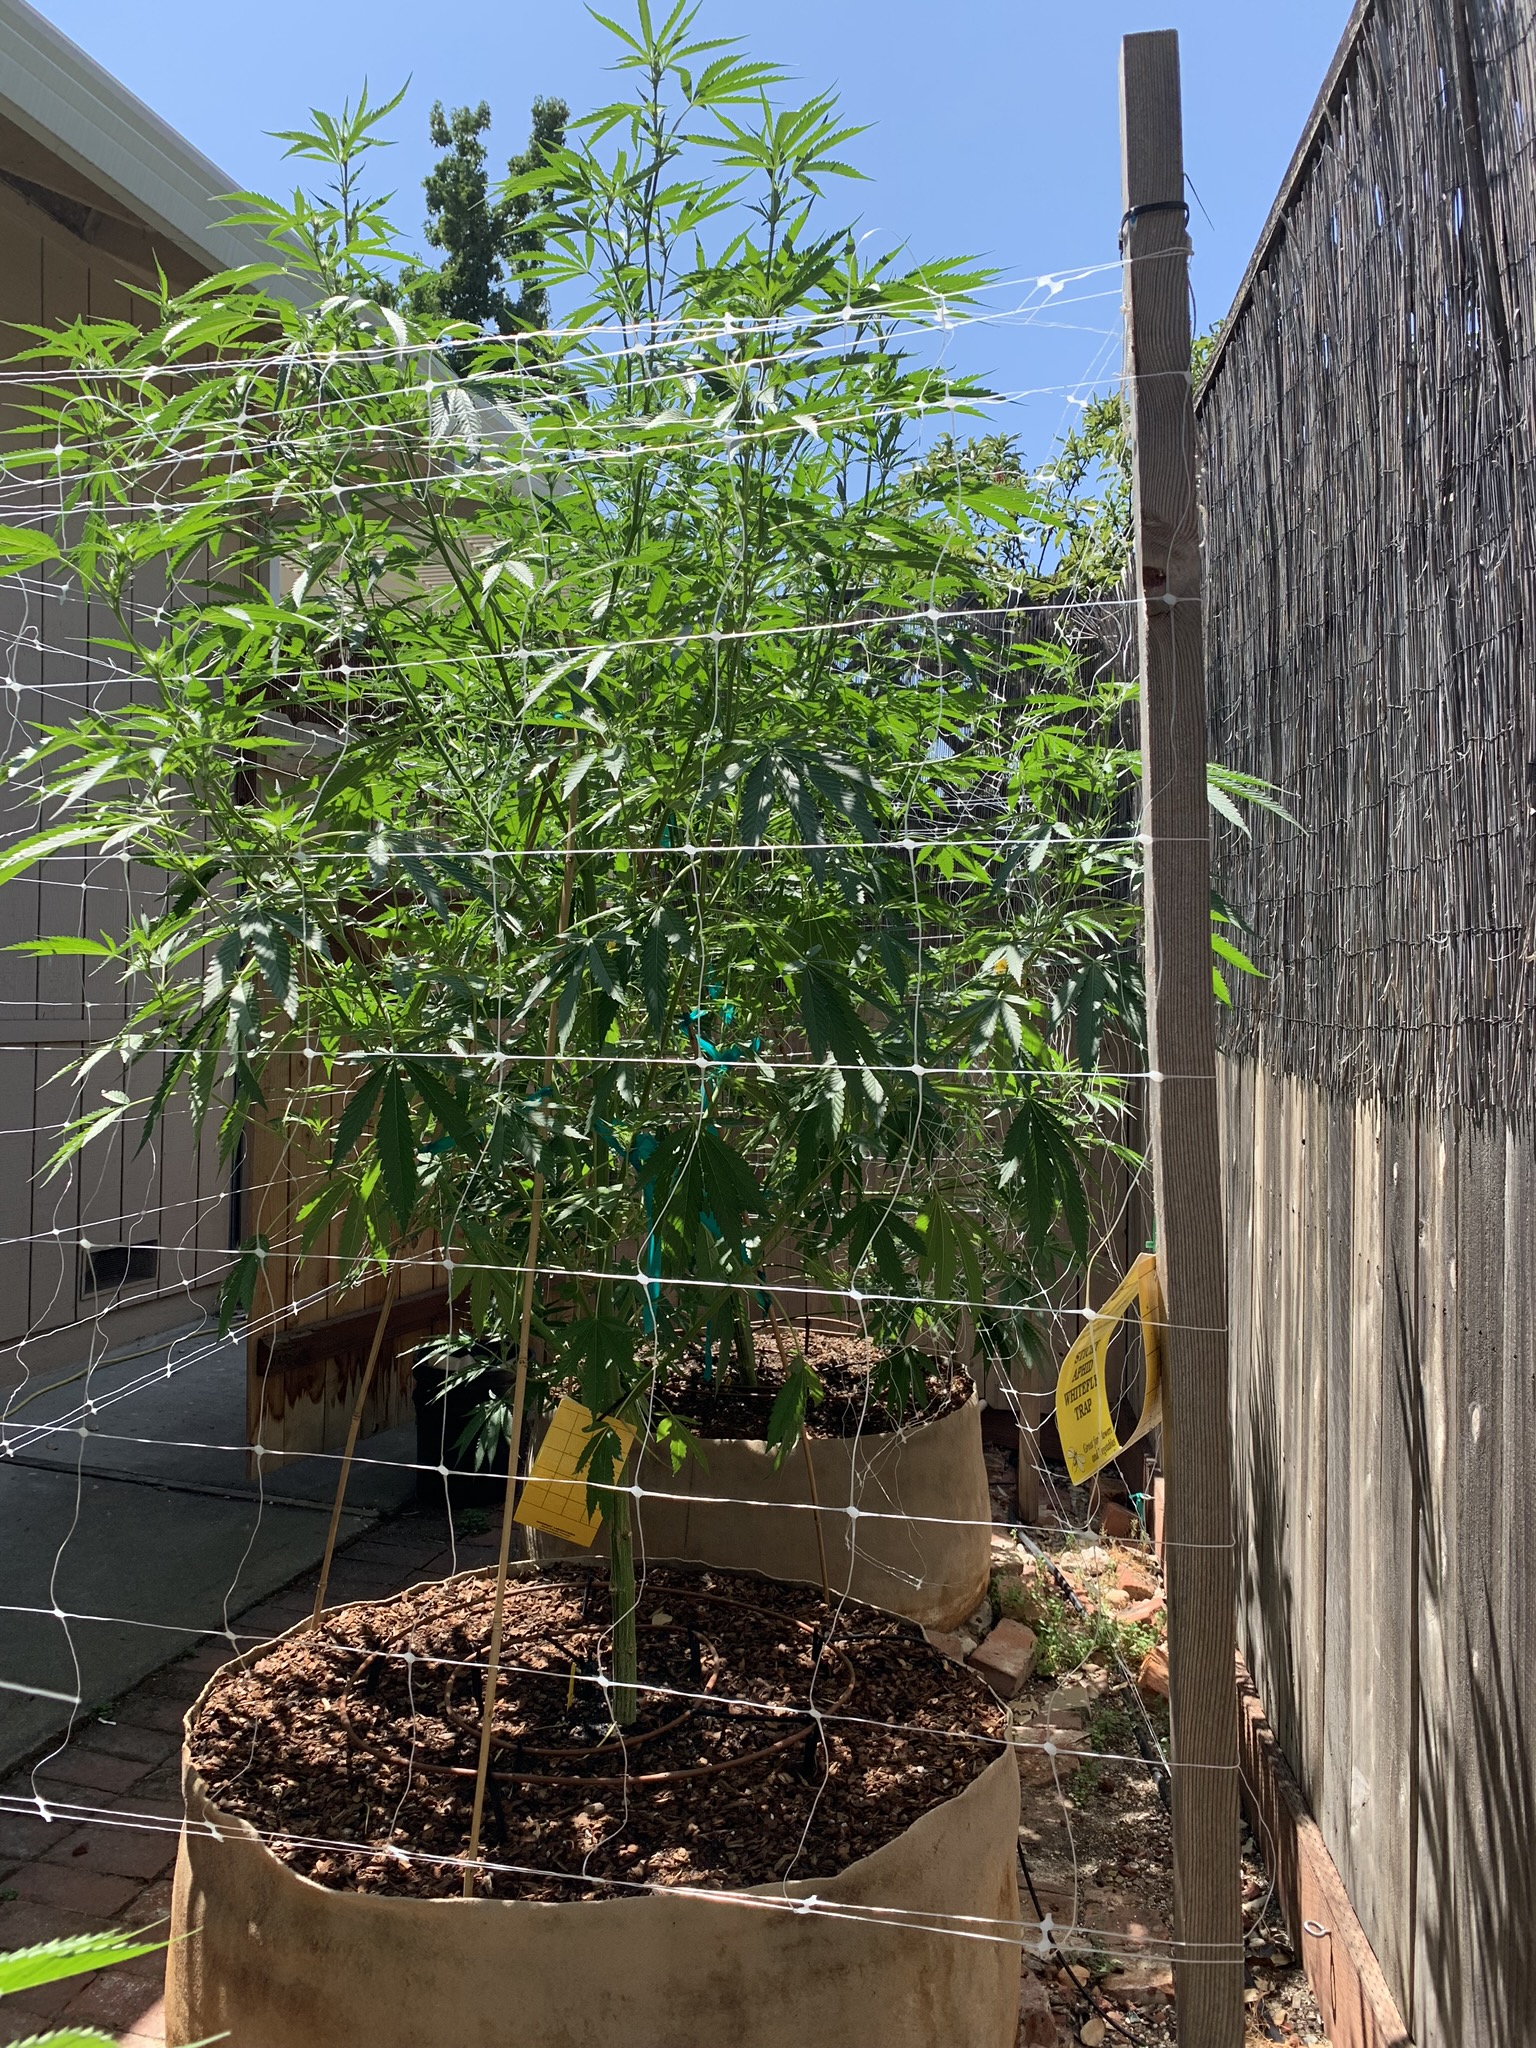
At this time your plants may have gotten pretty dang big. Maybe waaay larger than you thought they would. (I know, feel the pride, you deserve it, they are HUUUGE, pat yourself on the back!) For those of you who started seeds in February or earlier, I hope you have an orchard ladder! Because I’m a petite gal & grow in semi-urban/rural environments, I need to not only keep my plants at a respectful height, but be able to see all over each plant without killing myself on a wobbly ladder. I need to be able to make necessary health checks, keep an eye out for pests & watch those flowers closely to omit any caterpillars or bud rot. (My lovely husband fell off a small ladder while helping me trellis overly tall girls a couple years ago & broke his arm, it happens!) Toward the end of every season we will have a storm, with wind &/or rain & I don’t want to lose a bud laden branch or an entire plant to the weather. Getting that far in the season & finding sticky, broken branches caked with the mud they fell into really makes me want to cry. So, I save my ladies by making sure they are supported.
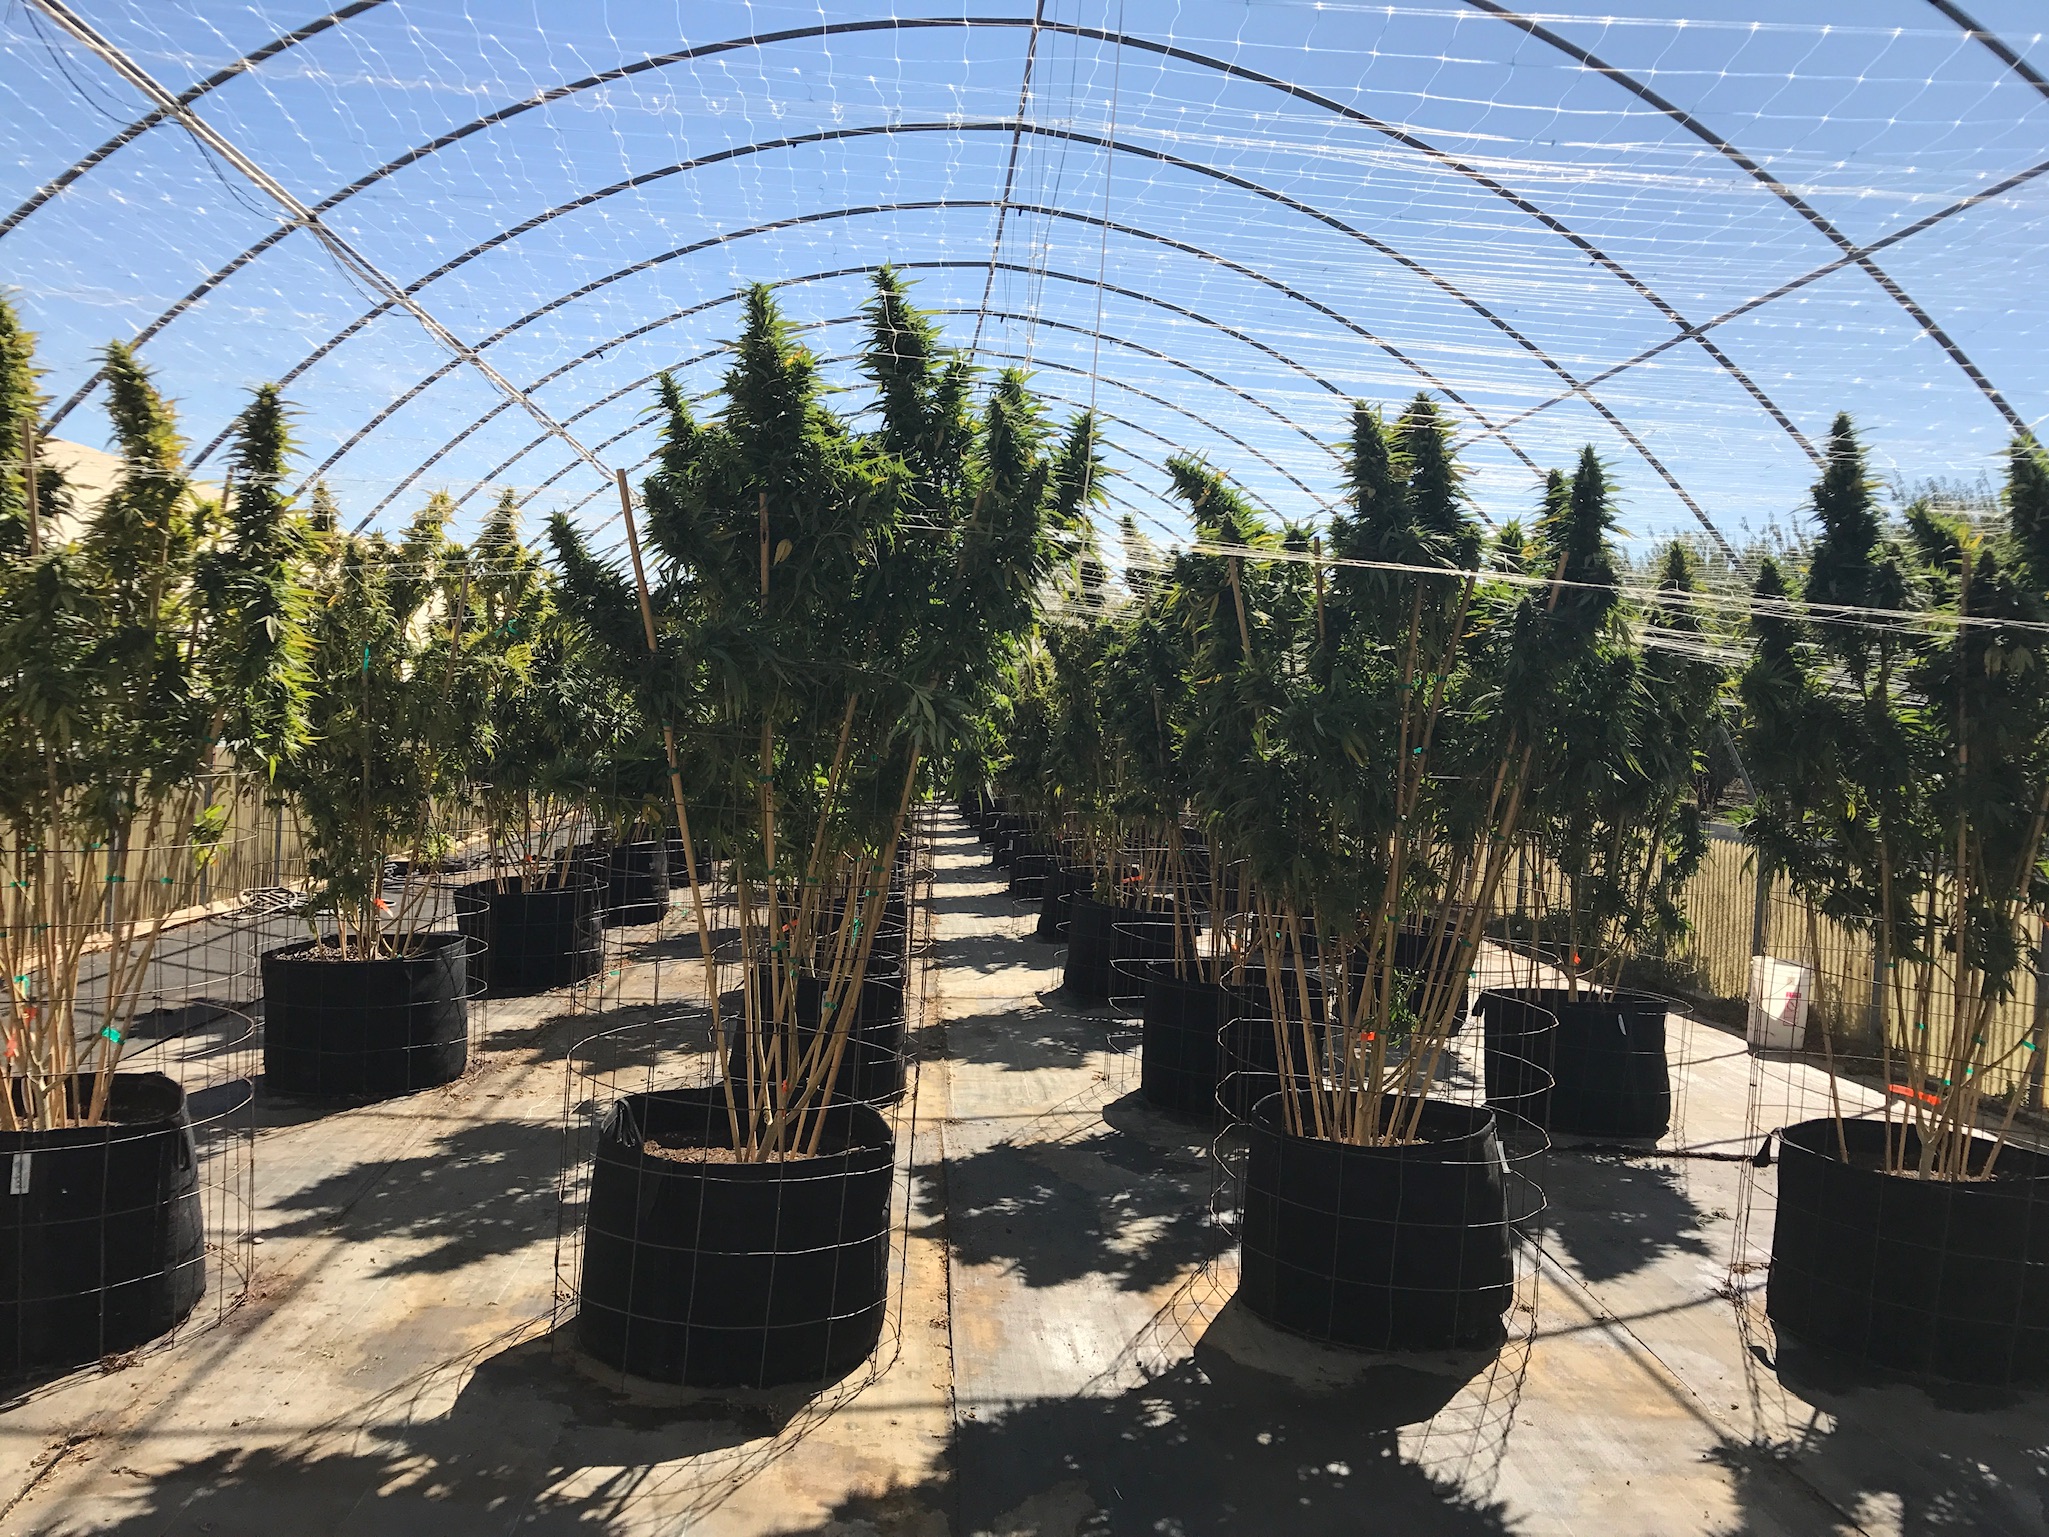
Adding support to your plants & their branches can be done in different ways. Back in the day, we caged them with bamboo tied with green tape, some support structures on large gals getting pretty labor intense. I think bamboo is a great option, for staking up smaller, independent plants, independent branches or plants in containers.
I’ve seen cattle fencing wrapped around each plant, & although a great, super sturdy option, it was way too heavy & too pricey for me. I also had nowhere to store it all for the next year. My favorite option so far has been trellis netting. I find it clean, simple, inexpensive & easy to use! Other reasons I love it:
- Supports branches laden with buds from breaking with weight
- Can support entire plants during high winds or rainy weather
- Can help train tall plant limbs below fence lines
- Help keep plants more manageable to care for at your height
- Can adjust the spacing of the limbs within the netting, opening up the canopy for more sunlight & air flow
- No mold or mildew issues
- Recyclable at the end of season
I prefer the 6” square netting in lightweight, plastic mesh. It comes in a variety of sizes & I can cut it to fit my needs. You can find it at your local garden center or online by different manufacturers. Often, we need to get inventive for our situation. I have never seen an outdoor grow, no matter if one plant or 50, that ever had the same situation as another. Not everyone works in rows or with raised beds…we work with the space we are granted & make it work for us. You could be growing in a sunlit corner on a back deck or in pots on your patio. You could have a plant or three tucked into different corners of your yard. The best support for your girls may take some imagination & maybe a combination of options, but should definitely be a top priority.
My two favorite ways to use trellis center around initial plant placement. I prefer raised beds or directly in ground, but also work with pots over open ground (I do not have the depth available to build soil) in short, easy to manage rows.
We lost a few here, but no more!

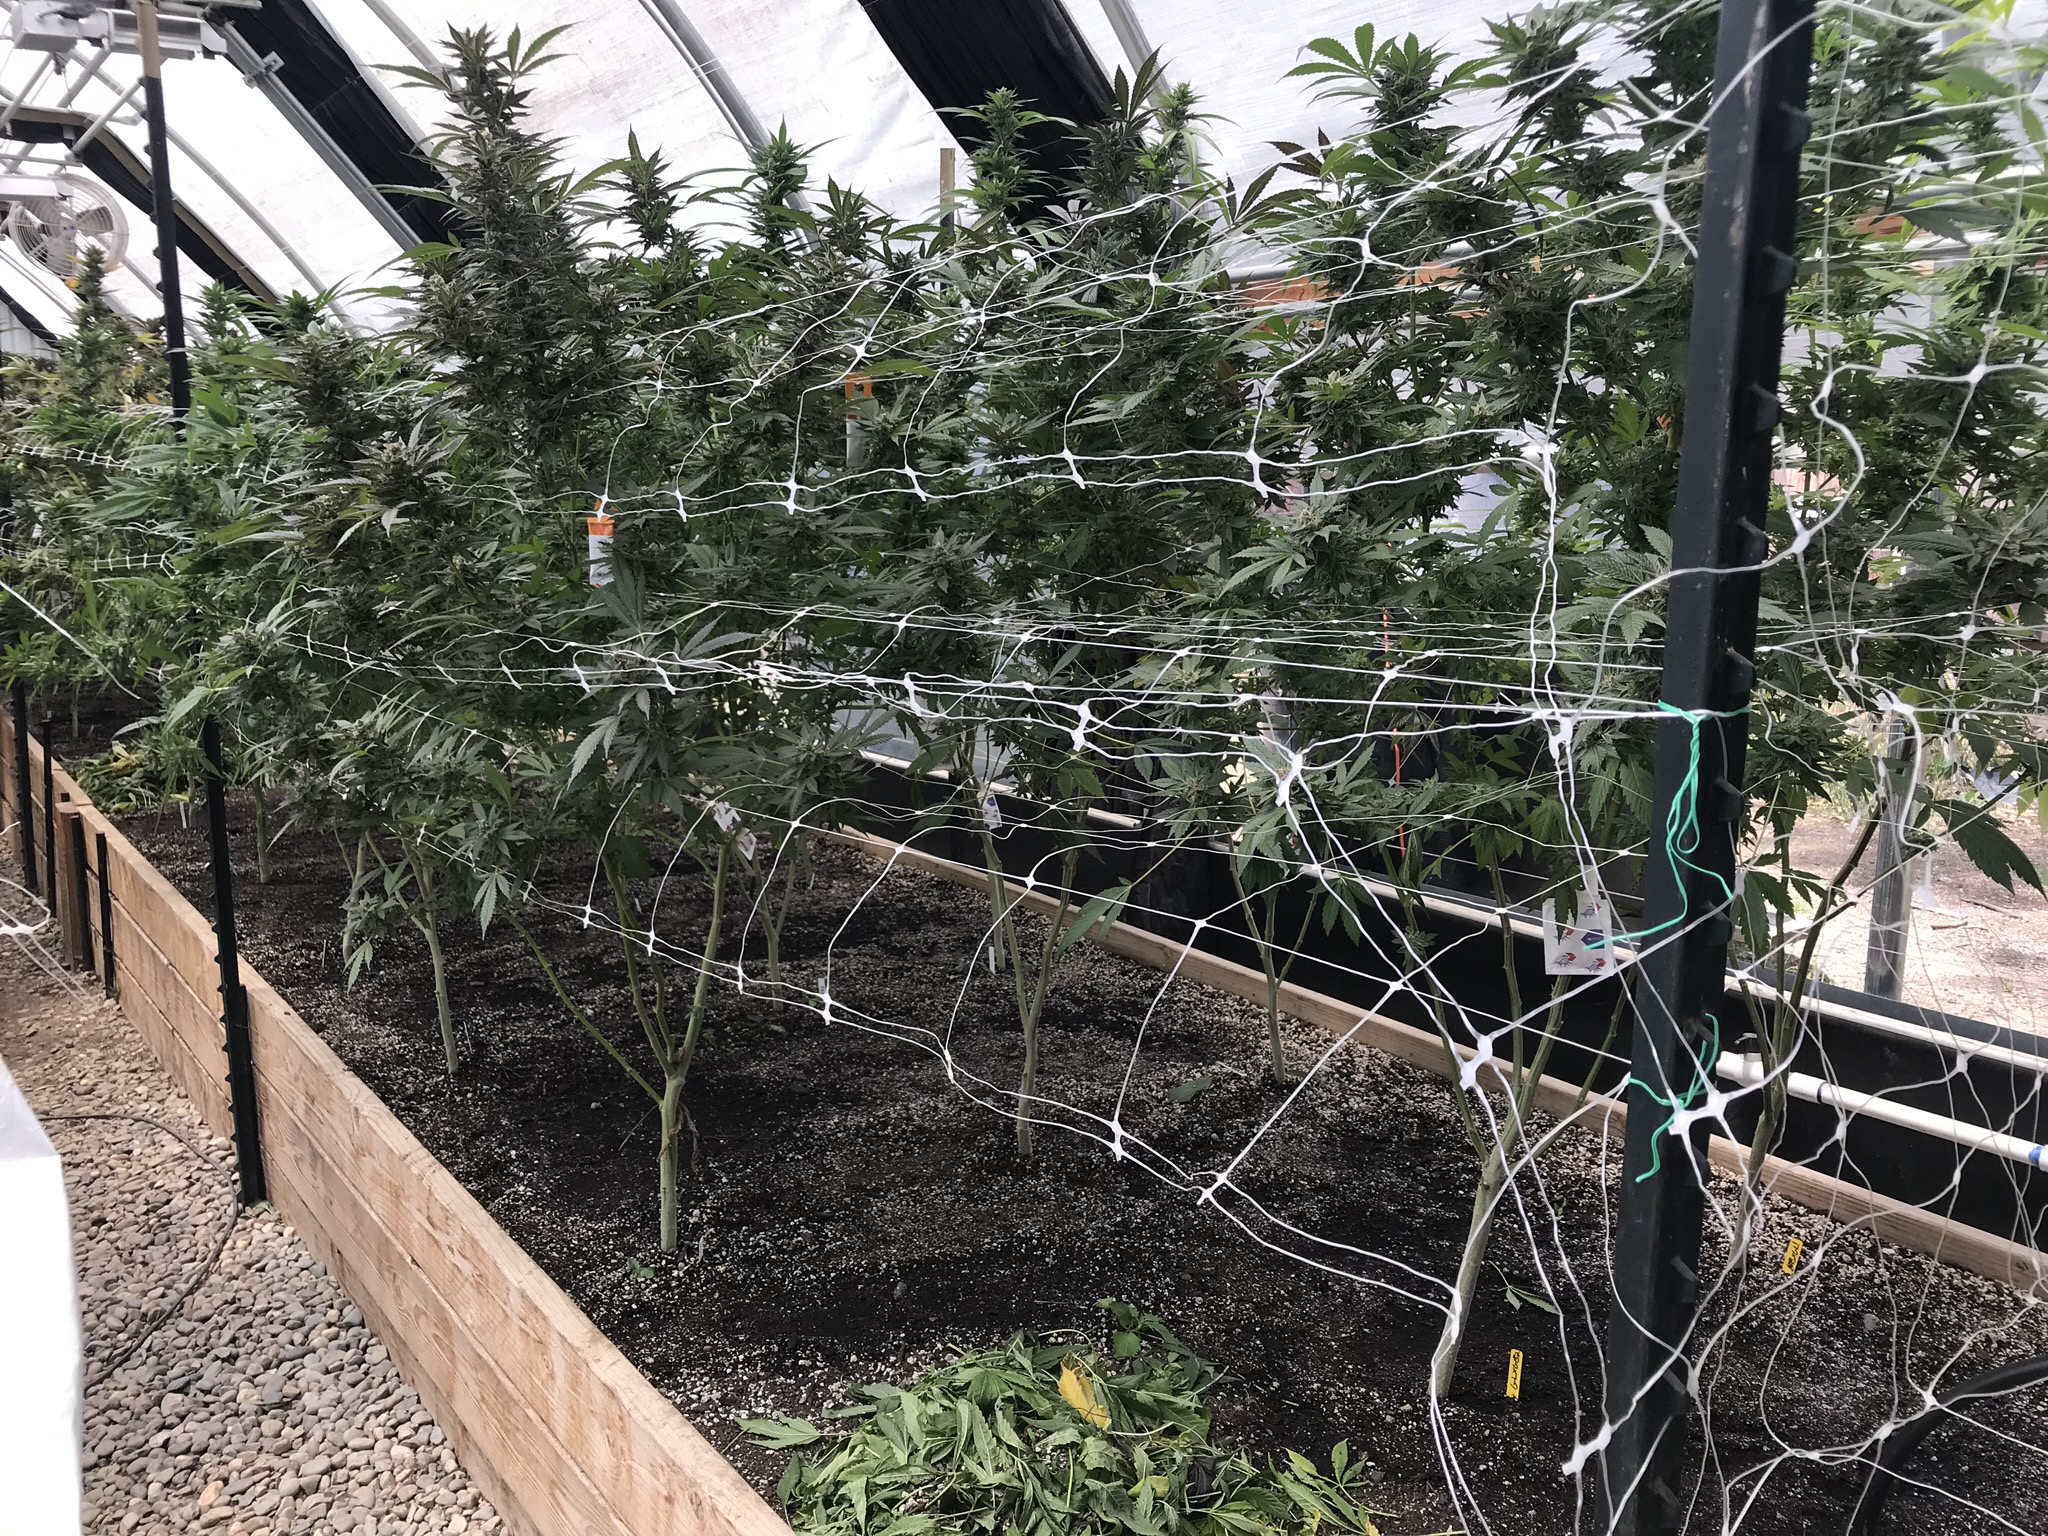
When growing in raised beds, I insert 4 super tall posts attached to steel stakes into the ground around the plant in a square, the poles as close to touching the plant as possible. Using a staple gun or zip ties & the help of my husband, we wrap the trellis snugly around the poles, around the plant, creating a “cage”. This allows me to get my trellis super close to the plant & gently pull the branches through the squares at the sides, giving them individual support & a place to rest. I attach the trellis high enough on the posts that I can still easily climb up under it & reach the base of my plant. High enough on the posts that it reaches close to the top of the plant. I also like to attach a piece of netting at the top, coming down in a snug square over each corner post, to secure the top & center branches.


My second favorite method is planting in rows. In regard to trellising, it makes the application super easy. Using the same tall poles attached to steel stakes, we pound them into the ground intermittently down the row, as close to the plants as possible & evenly spaced, with two poles at each end. We can then attach the trellis at one end, unraveling & wrapping the trellis down one side of the row, around the poles at the end, all the way down the other side until closing the loop at the end we started on. One, long “cage”. If you really plan ahead, starting when they are still babies, you can attach the netting in a horizontal layer, allowing the plant to grow up through it, cradling the branches with each individual layer added throughout growth.
If you do not have posts & steel stakes or the ground to set them, you can simply – very gingerly – drape a net over the top of your plant, over each top branch, allowing it to hang down the sides. You can then weave the side branches up into the squares, the plant inadvertently helping support itself. To give it a bit of extra strength, if you can, create a bamboo “tee-pee” inside the plant, anchoring the stalk with three bamboo stakes tied with green tape. Voila! Regardless of how it looks or how it goes together, having some support, in any way, is better than having none!

Nutrition – Feeding for Bloom
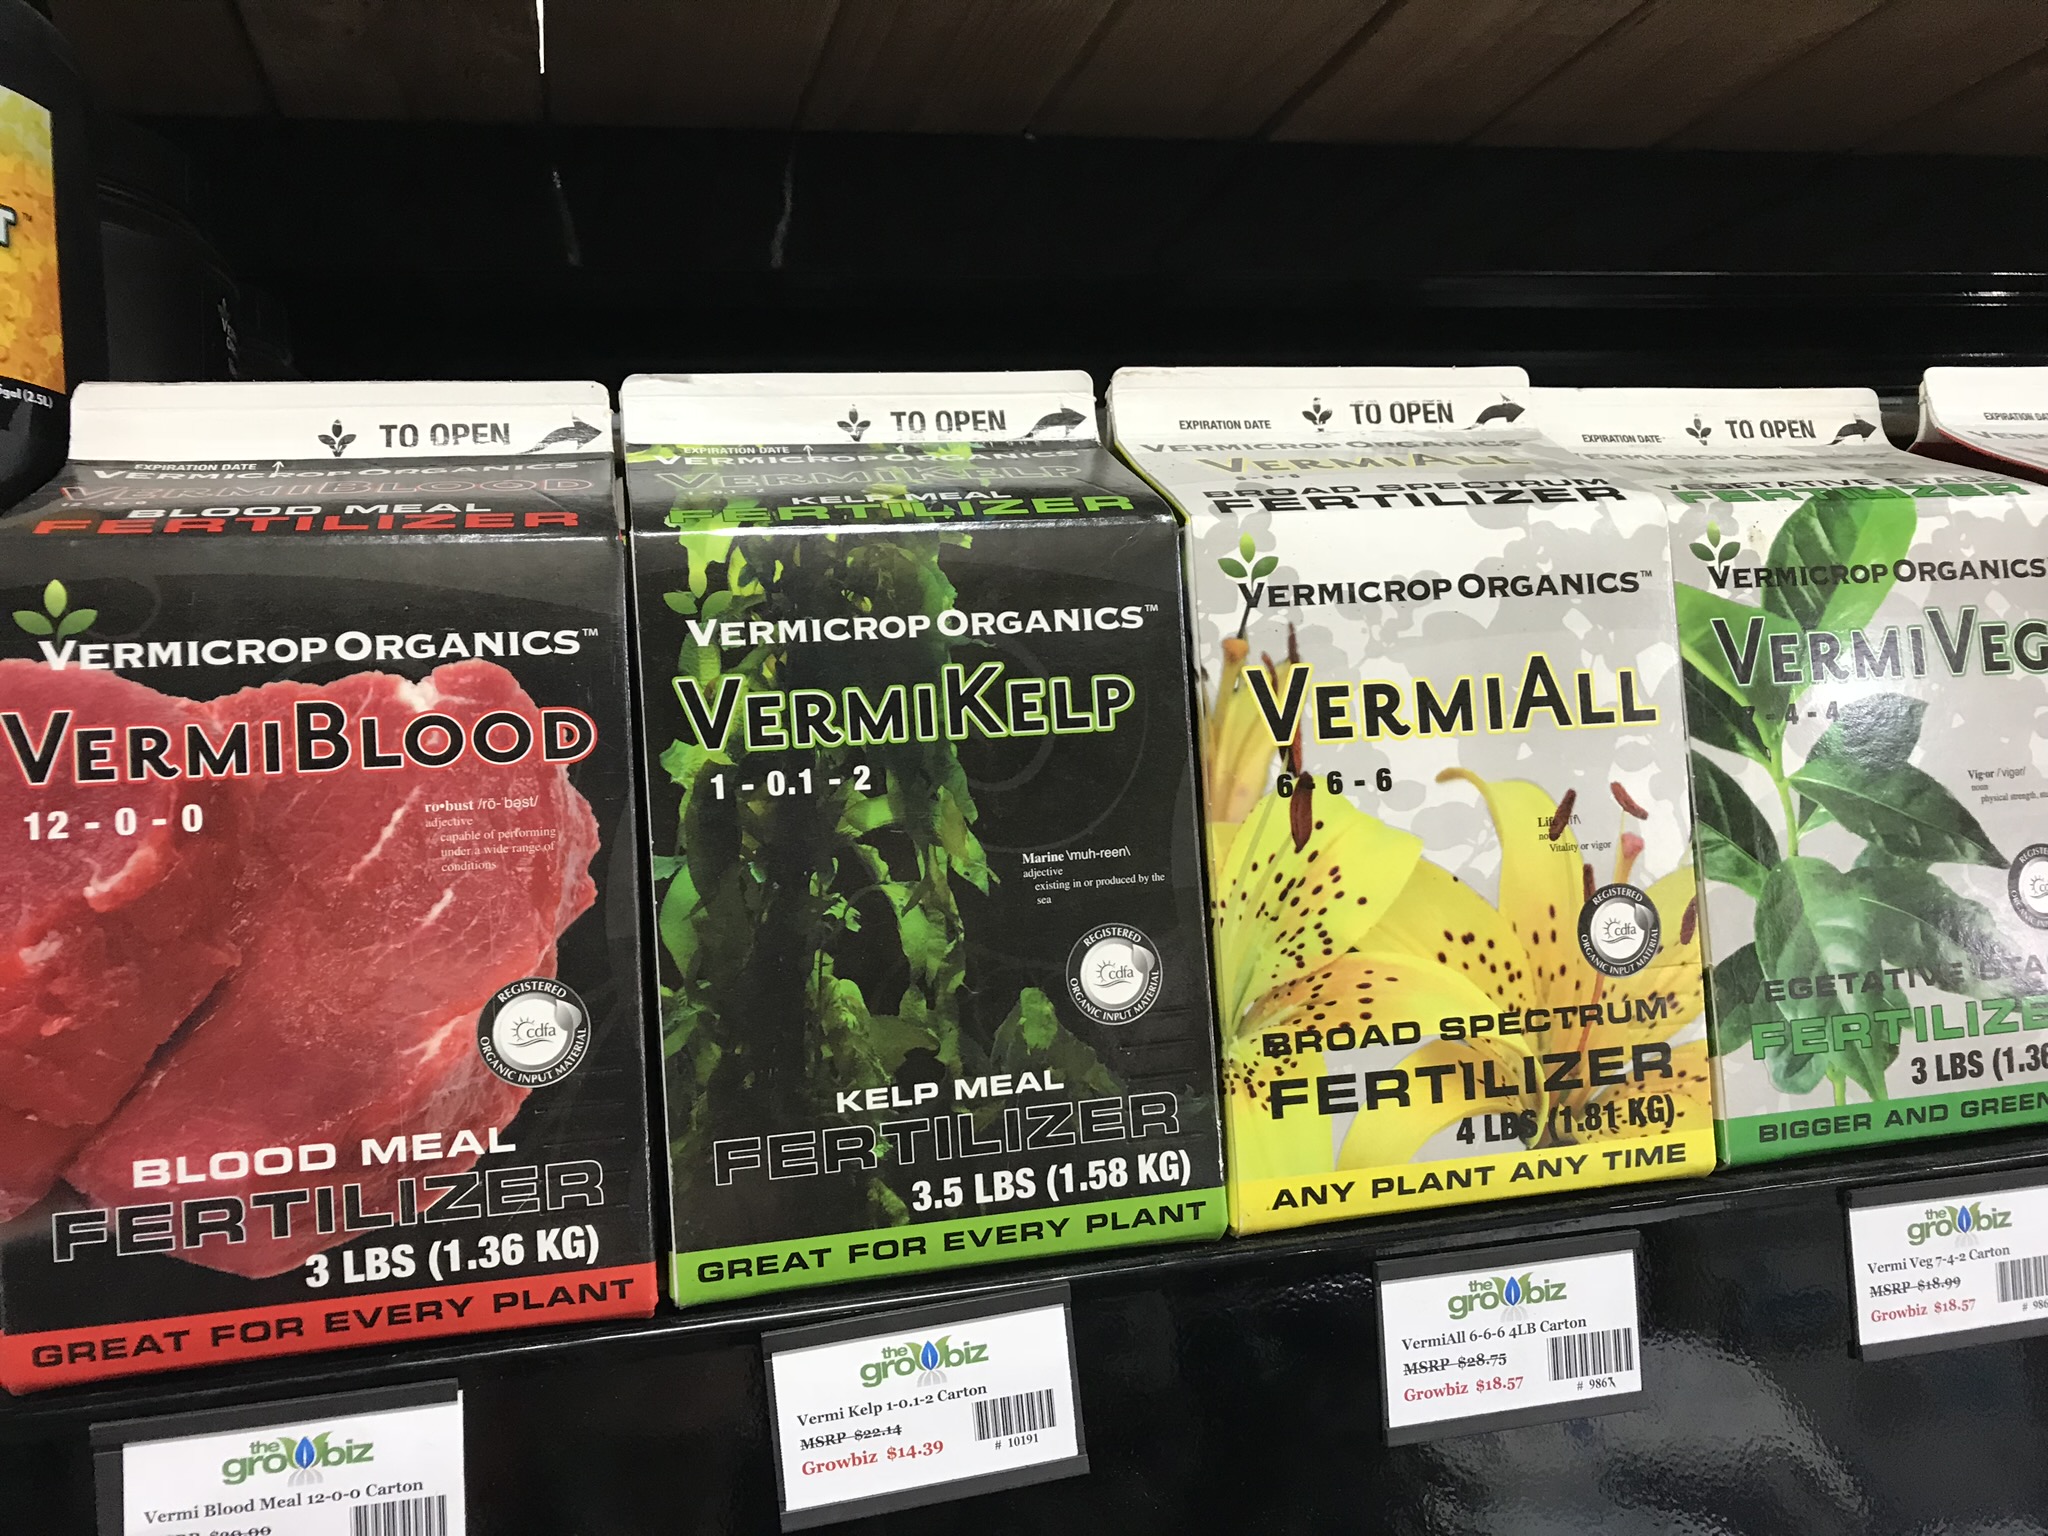
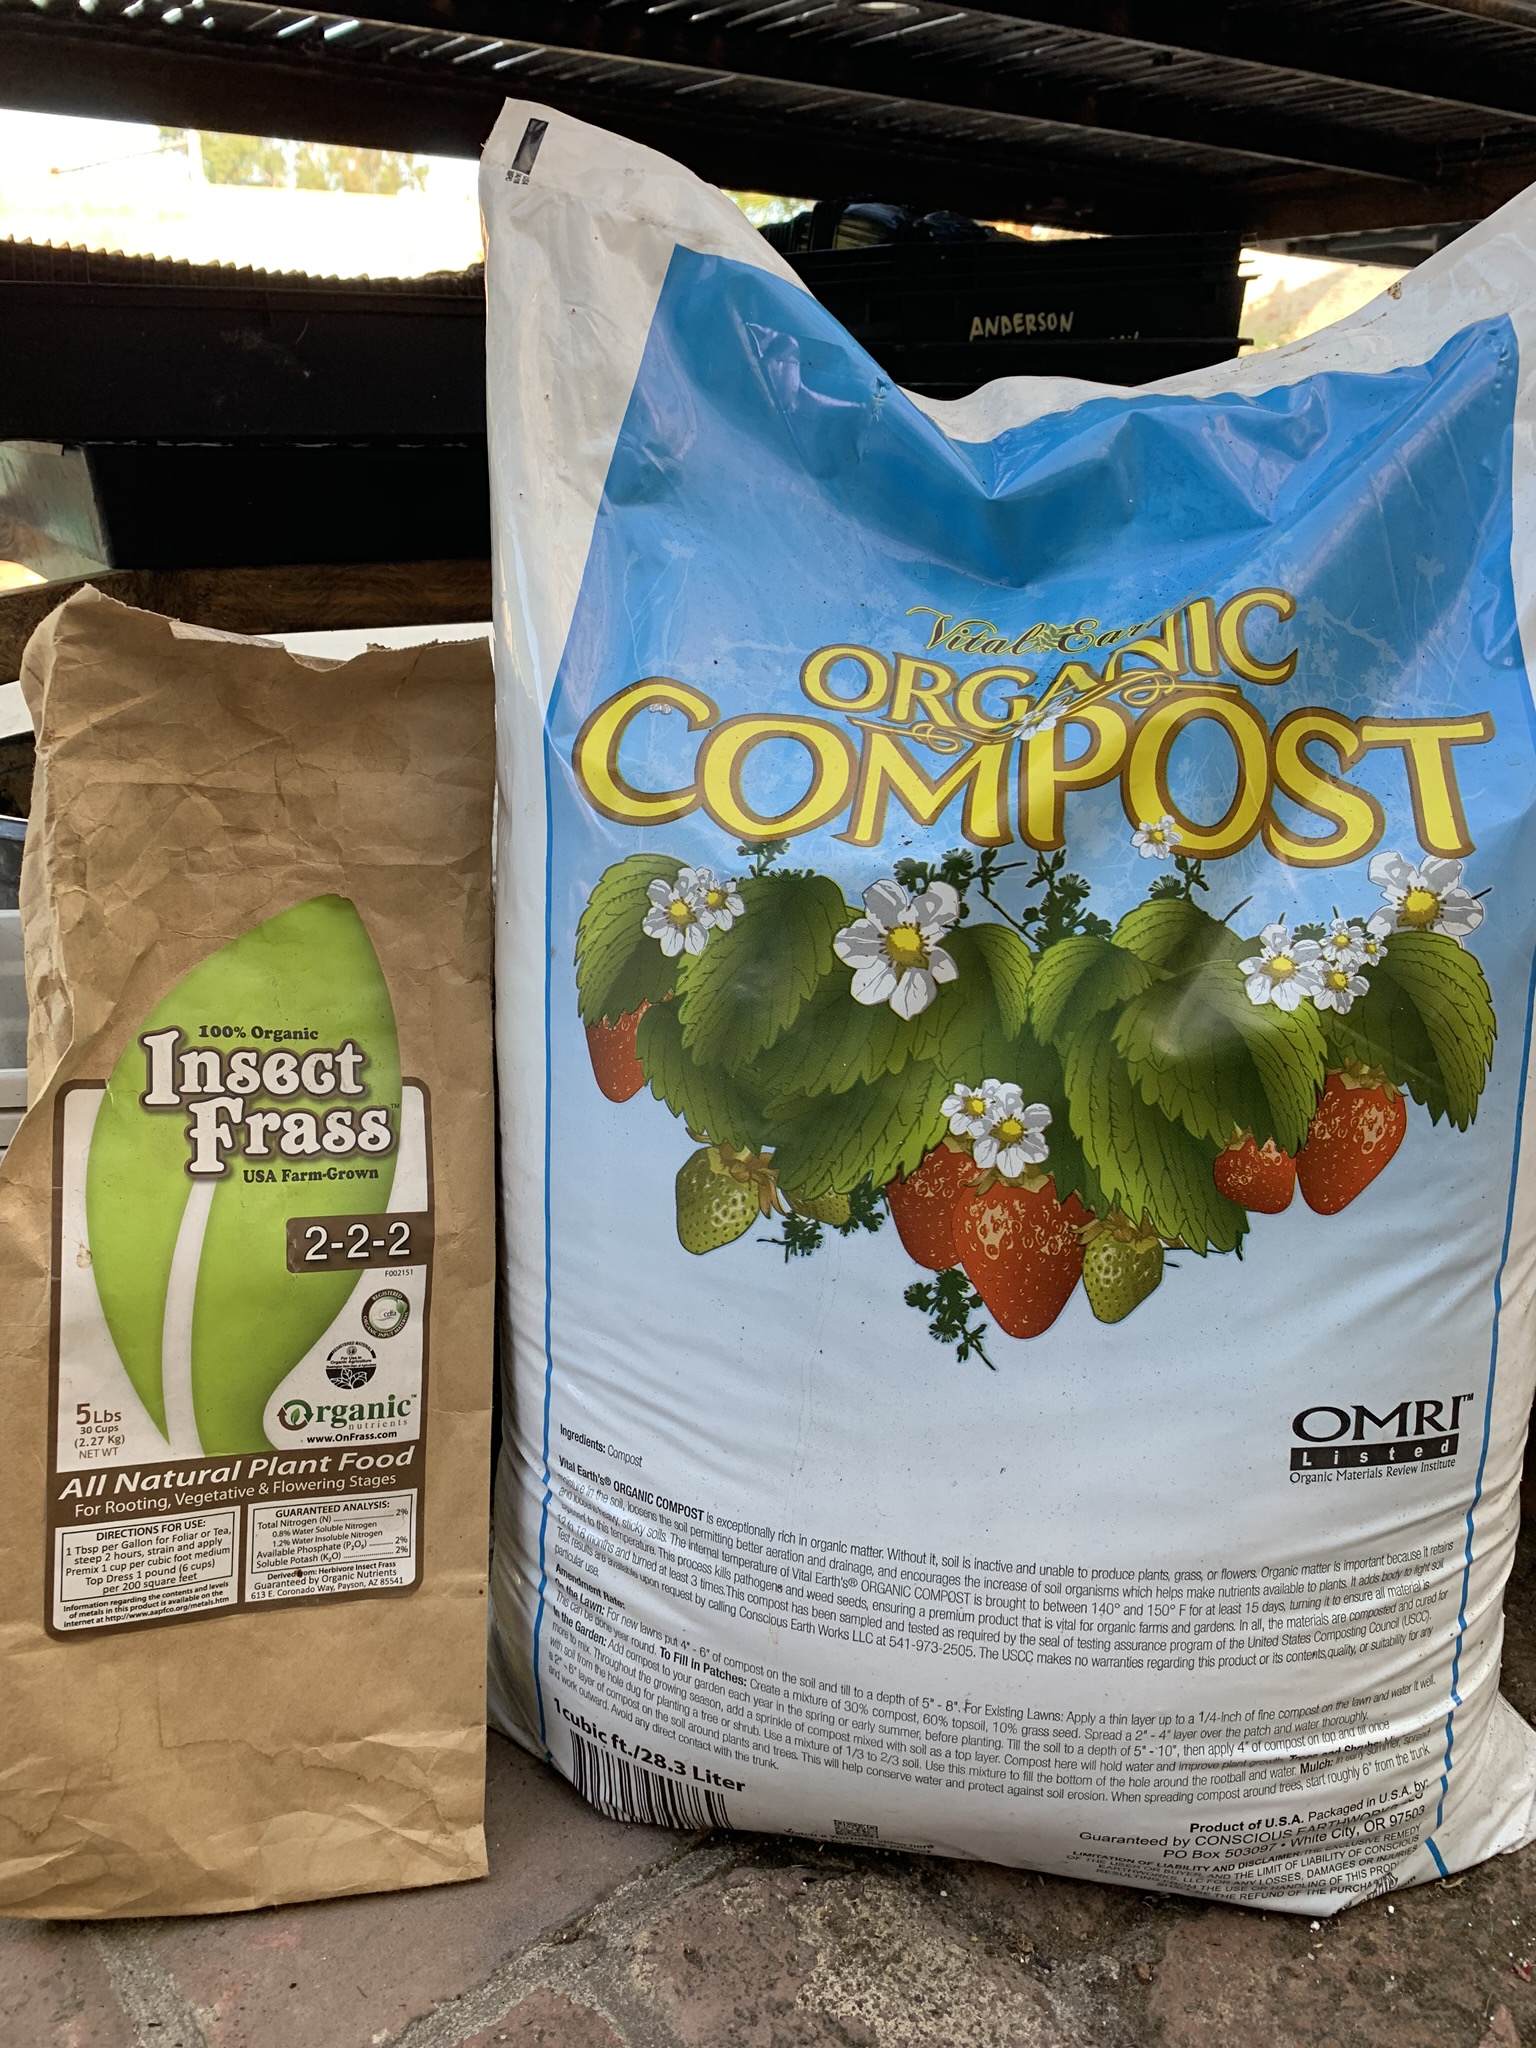
Flower is underway & the clock is ticking! Calendaring the start date of flower for each strain you are growing is very important. This allows you to prepare for the potential harvest date, giving you 8-12 weeks until flower maturity. Within this next 8-12 weeks we want to make sure our plants have the nutrients they need to stay as healthy & resilient as possible, producing the best versions of the flower they are genetically geared to produce! Now, I organically amend my soil on a regular basis throughout the season & know it contains plenty of nutrients. I could just use water & roll with it, but I want to ensure I’m giving my girls the opportunity to be the absolute best they can be. It makes ME feel good! I also know that large cannabis plants get hungry, especially in pots, & lacking magnesium in bloom is common so I want to set my ladies up for success. Knowing this, I top dress at the start of flower with a natural, organic, dry fertilizer with a lower Nitrogen count & mix in some langbeinite, a “naturally mined crystalline mineral providing the water-soluble sulfate form of potassium, magnesium and sulfurs.” I love Vermicrop Organics “VermiBloom” 3-10-5 Fruit & Flower alongside Down to Earth’s water soluble langbeinite. I then add a nice 1” layer of quality compost. Compost helps naturally balance the soil PH, helps retain water & adds nutrients as it breaks down. Lastly, I sprinkle a generous amount of 100% Insect Frass (poop) 2-2-2 that helps keep pests at bay. I add this around the base of my plants as a natural insect deterrent that also adds nutrients.I LOVE a multitasker!! When using dry nutrients such as these, applied in this fashion, they need to be added with enough time in advance of when you want your plants to receive the nutrients. Dry amendments take time to break down & become available to the plant. I’ve noticed it can take about two weeks (longer for others depending on the ingredients in the blend & brand!), because I can generally see the rush of health in the plant when it kicks in. So wild! Given the wait time after application, planning WHEN you add nutrients in this manner is very important for maximum benefit. If I am flowering an 8 week strain, I anticipate my girls will be getting the good stuff by week 2, right when they really need it, through the end of flower. In addition to these nutrients, I water with a liquid compost tea every two weeks. The compost tea adds a small amount of nutrients easily absorbed by the plant immediately, while helping break down the organic matter & fertilizer in the soil, making it available to the plants. I love organic amendments for I prefer to feed my soil & use it again & again. My soil really seems to get even better year after year! Another super cool reason to roll organic!? NO NEED TO FLUSH! When using synthetic nutrients, one must flush – feed ONLY with water – for the last couple weeks. I can honestly tell when synthetic nutes are used & not adequately flushed (even then I feel I can still tell). The flavor & aroma are altered, showing what I call the mouth puckering “hairspray effect”. The soil doesn’t love it either, as synthetics can leave salt residues in the soil that can burn your plants. Chemicals, just yuck.
IPM – Integrated Pest Management
Wait, what?!?
“IPM is a process to solve pest problems while minimizing risks to people & the environment…an ecosystem-based strategy that focuses on long-term prevention of pests or their damage through a combination of techniques such as biological control, habitat manipulation, modification of cultural practices, & use of resistant (plant) varieties. Pesticides are used only after monitoring indicates they are needed according to established guidelines, & treatments are made with the goal of removing only the target organism. Pest control materials are selected and applied in a manner that minimizes risks to human health, beneficial and nontarget organisms, and the environment.”
– UC California Department of Agriculture & Natural Resources
Basically, IPM is using natural prevention & environmental methods safe for the humans, pets & wildlife within the habitat, prior to jumping in bed with environmentally damaging pesticides. Even when using a pesticide is the last resort, it should be chosen with utmost care, all things considered.
I have been growing in my specific environments for years & I have learned the hard way which pests & disease are problematic to me & why. A “pest” can take many forms depending on where you are located… from deer & voles to aphids or the dreaded russet mite. (Just writing it makes my skin crawl!) There are many factors that affect what you may be up against – your weather (temperature, humidity), the surrounding vegetation, air flow & overall health of the plant play key roles. Learning your environment & microclimates can take some time, close attention & research to see the patterns. Planning for pest & disease control is key when looking to harvest a healthy crop & – I’ll say it again – we need to be proactive instead of reactive. When faced with what may feel like an infestation, & we all as gardeners have been there, resist the urge to react with drastic sprays & instead take a deep breath. There are other options worth trying first & our goal is to grow healthful medicine. As we head into flower, the fact that we are “in flower” presents it own limitations when dealing with pests. Spraying the buds? That can get real dicey & I look to avoid it, with one exception I’ll share in a minute.
Keep the bugs off the nugs! My suggestions for preventive & proactive IPM:
- Get a jewelers loupe. If you don’t yet have one, get one now, it will be your best friend. A tiny, inexpensive magnifying glass. I get mine at Growbiz, it even has a tiny light. I keep mine on a lanyard & it goes into the gardens with me at all times. I have to wear reader glasses (that’s like double magnification lol!) so I put them on & look through my loupe, in the sun, for my best visibility. If I find a leaf with damage, I’ll usually pluck it from the plant to best observe it. If just checking the plant randomly, the loupe allows me to view undersides of leaves without removing them, although I may really have to crawl around.

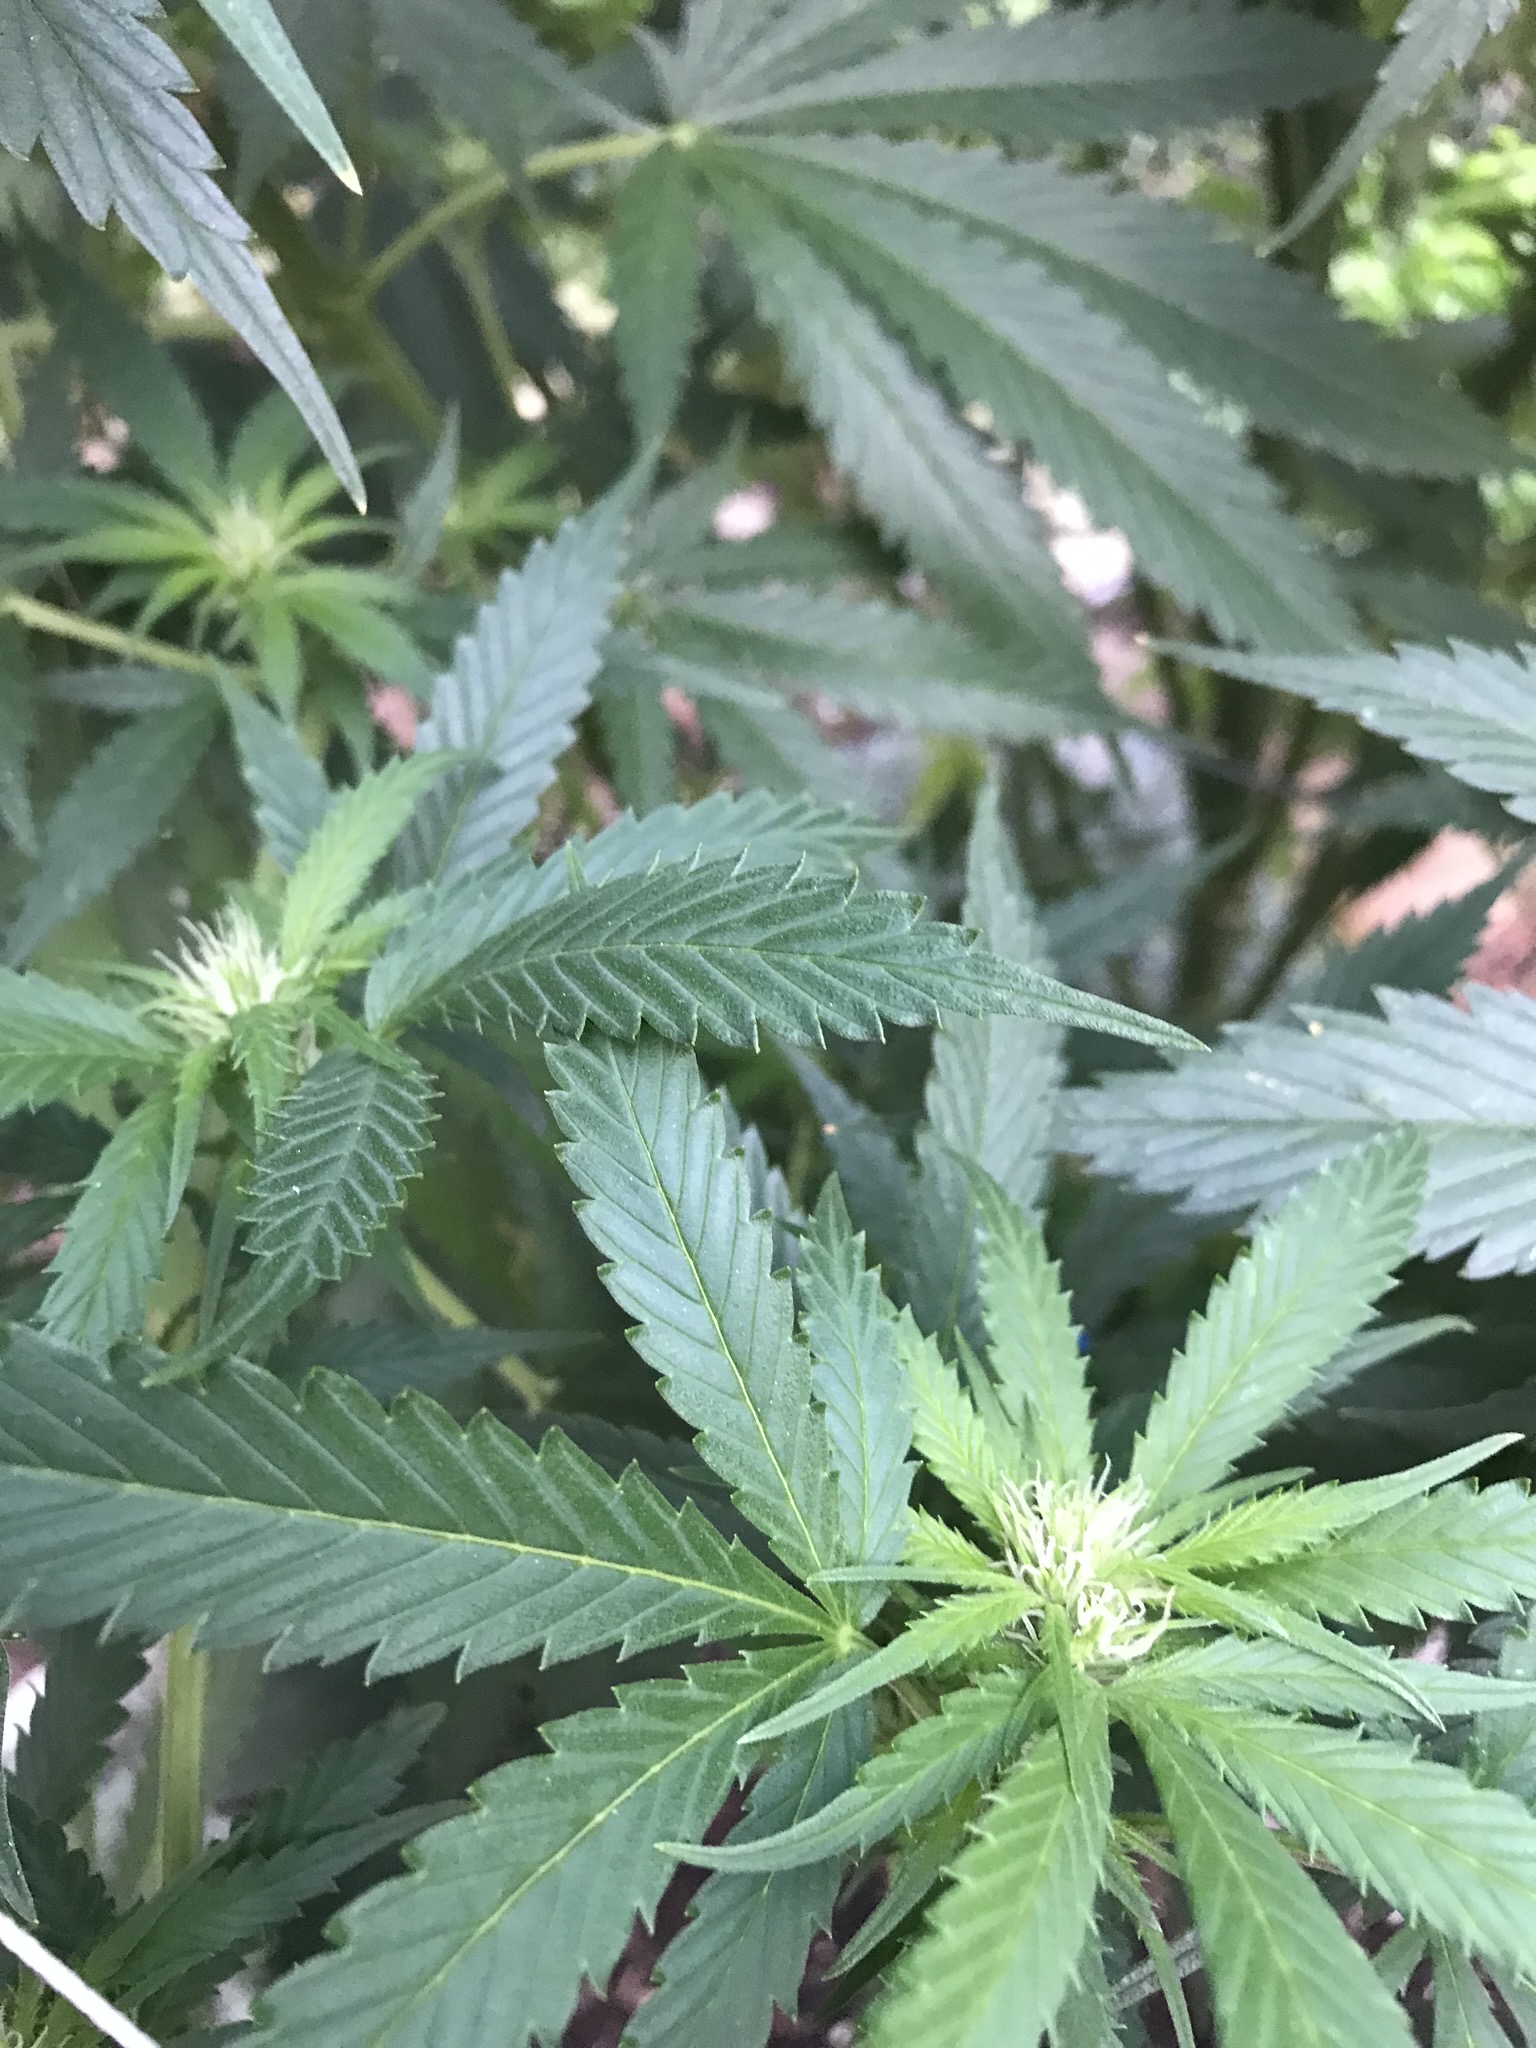
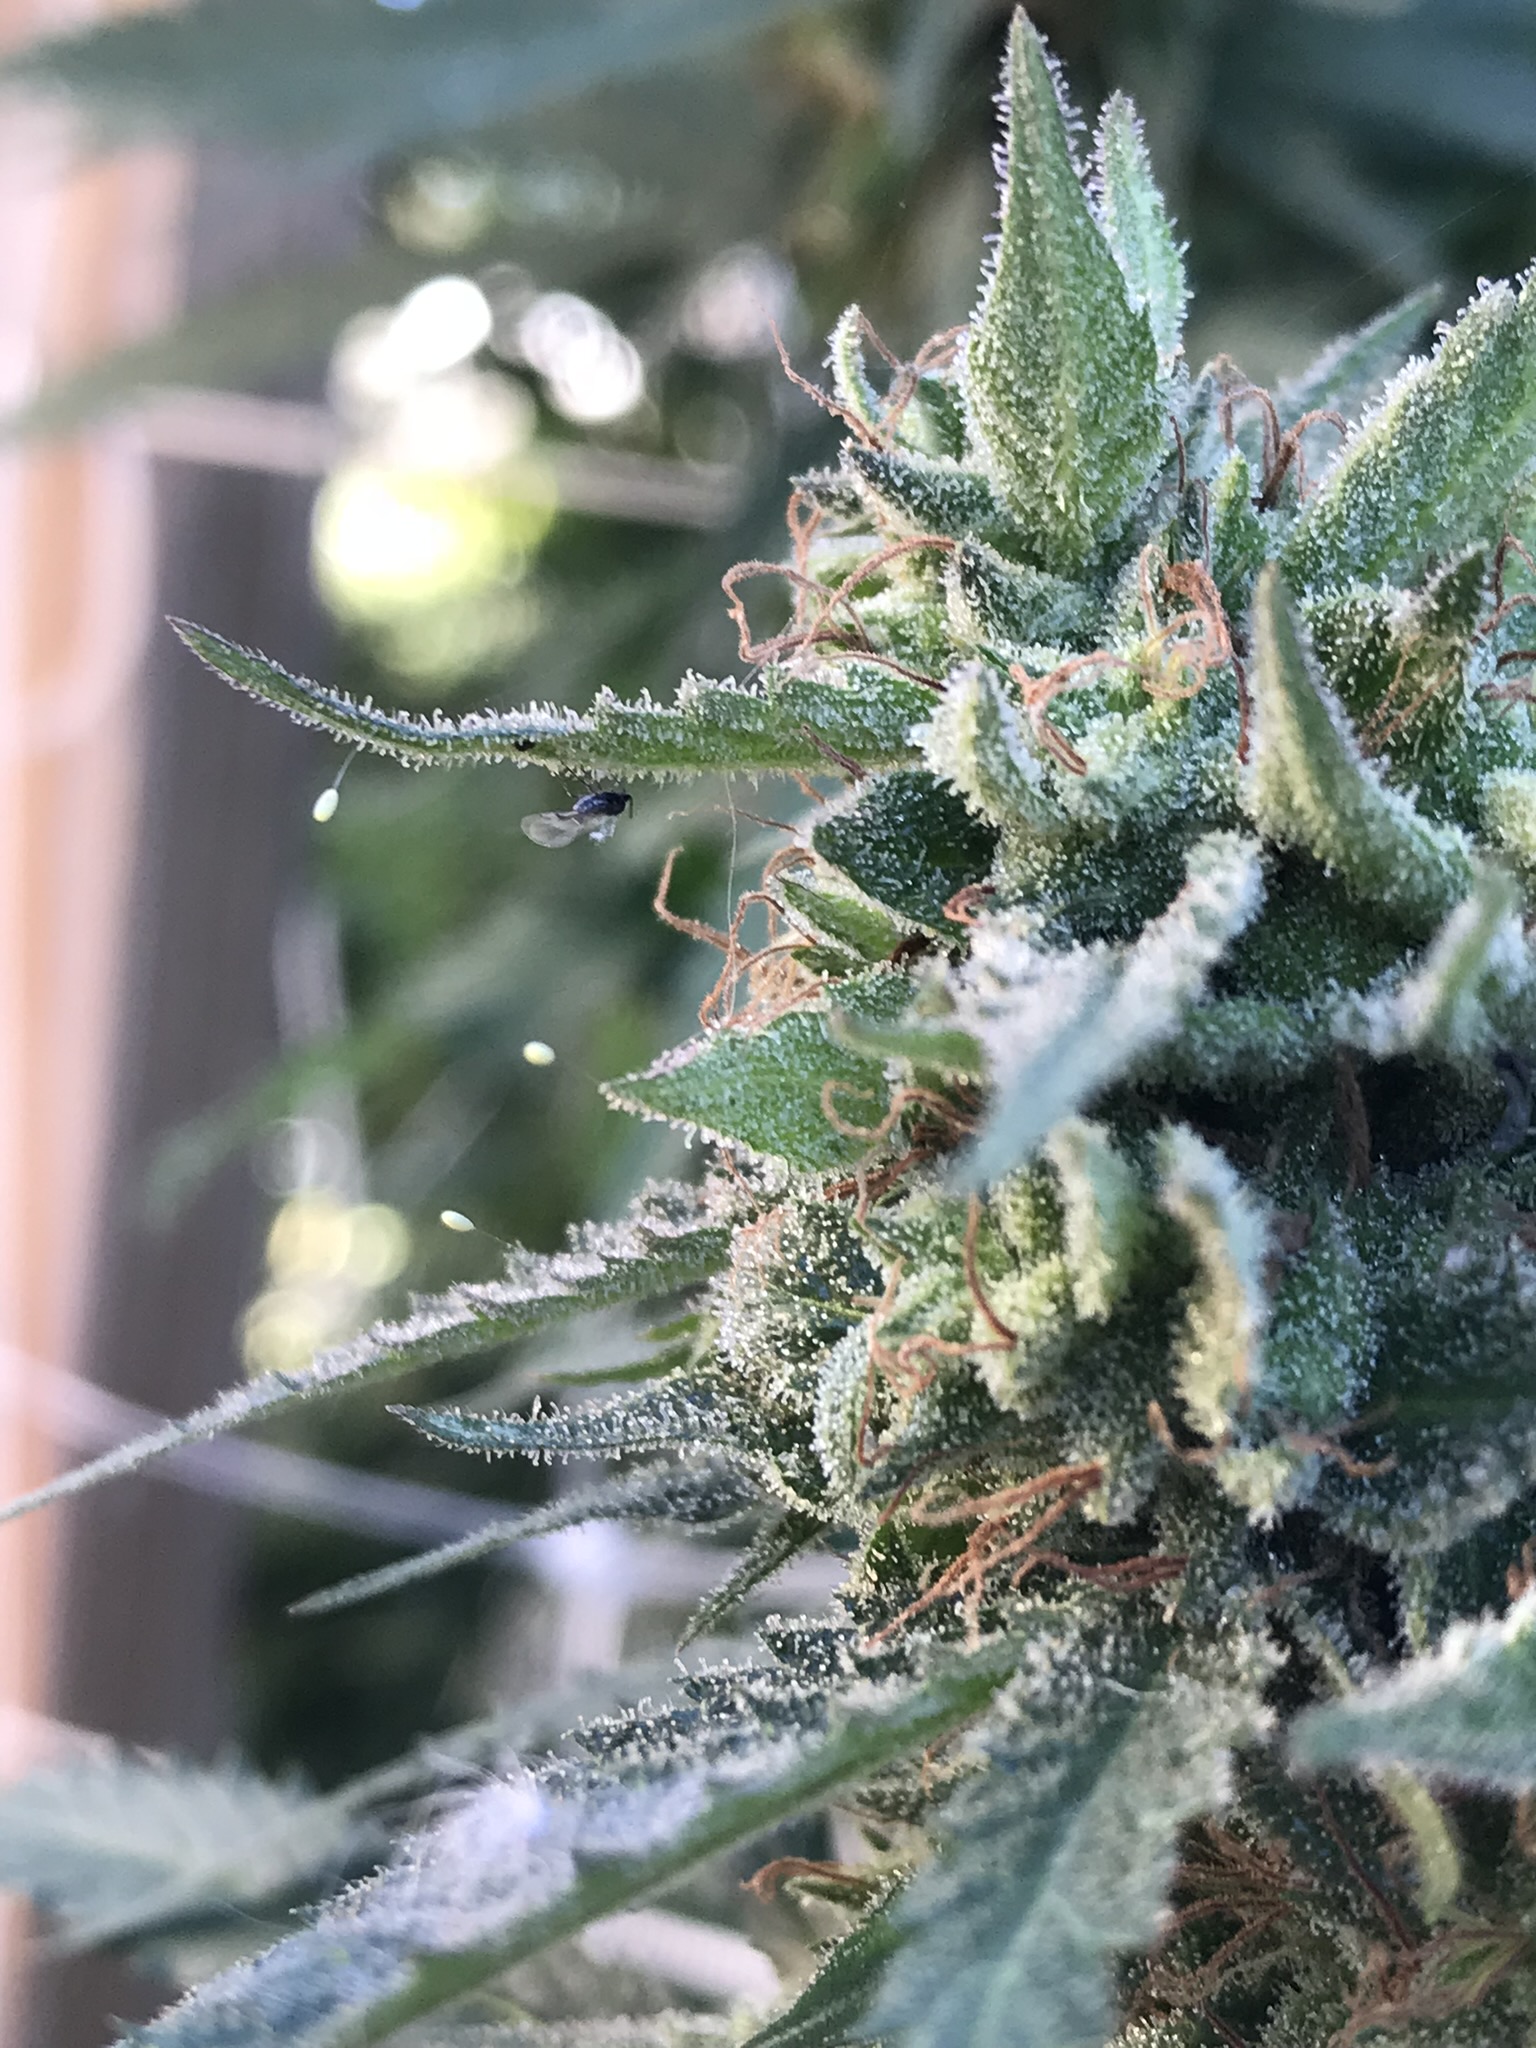
- Pay close, close attention EVERY DAY. It’s one of the reasons I still love hand watering even with drip lines installed… I get to spend the one on one time looking closely through my plants! By looking closely, I mean get up in that big mama!! Look under the leaves, crawl on the ground underneath if you have to! If you see tiny yellow spotting on your leaves, something is eating it. Most bothersome insect pests (to cannabis) thrive on the undersides of leaves & suck the life juices from the leaf leaving a “stippling”, a yellow, spotted appearance. Mites, thrips & whiteflies cause this type of damage. If you see this, pull out your loupe, check the undersides of the leaf & try to find the culprit. Other signs are tiny black dots near the damage – insect poop! (Yes, they poop where they eat, yo.) If you notice a shiny, snail like slime called “honeydew”, aphids are notorious for excreting this & it will cause black mold to form on leaves or groups of ants to hoard it. If you see a team of ants heading somewhere on your plant, follow them! They will likely lead you to something. Another pain in the butt for me during flower is caterpillars. Oh, they get me in my area! When in the midst of flowering, moths like to lay their eggs on the sweet tips of the flowers, which equals caterpillars eating your buds & causing rotten spots!! (I always imagine them really stoned & looking like the Alice in Wonderland version lol!) Ah, I joke, but there is nothing more horrible than admiring a huge, stunning cola for weeks only to one day see a big, brown, gooey rotten spot where the caterpillar has eaten out the inside, creating a nasty little rotten poop cave & ruining the entire cola. Booo all over that!! Pay close attention, all over, all the time!

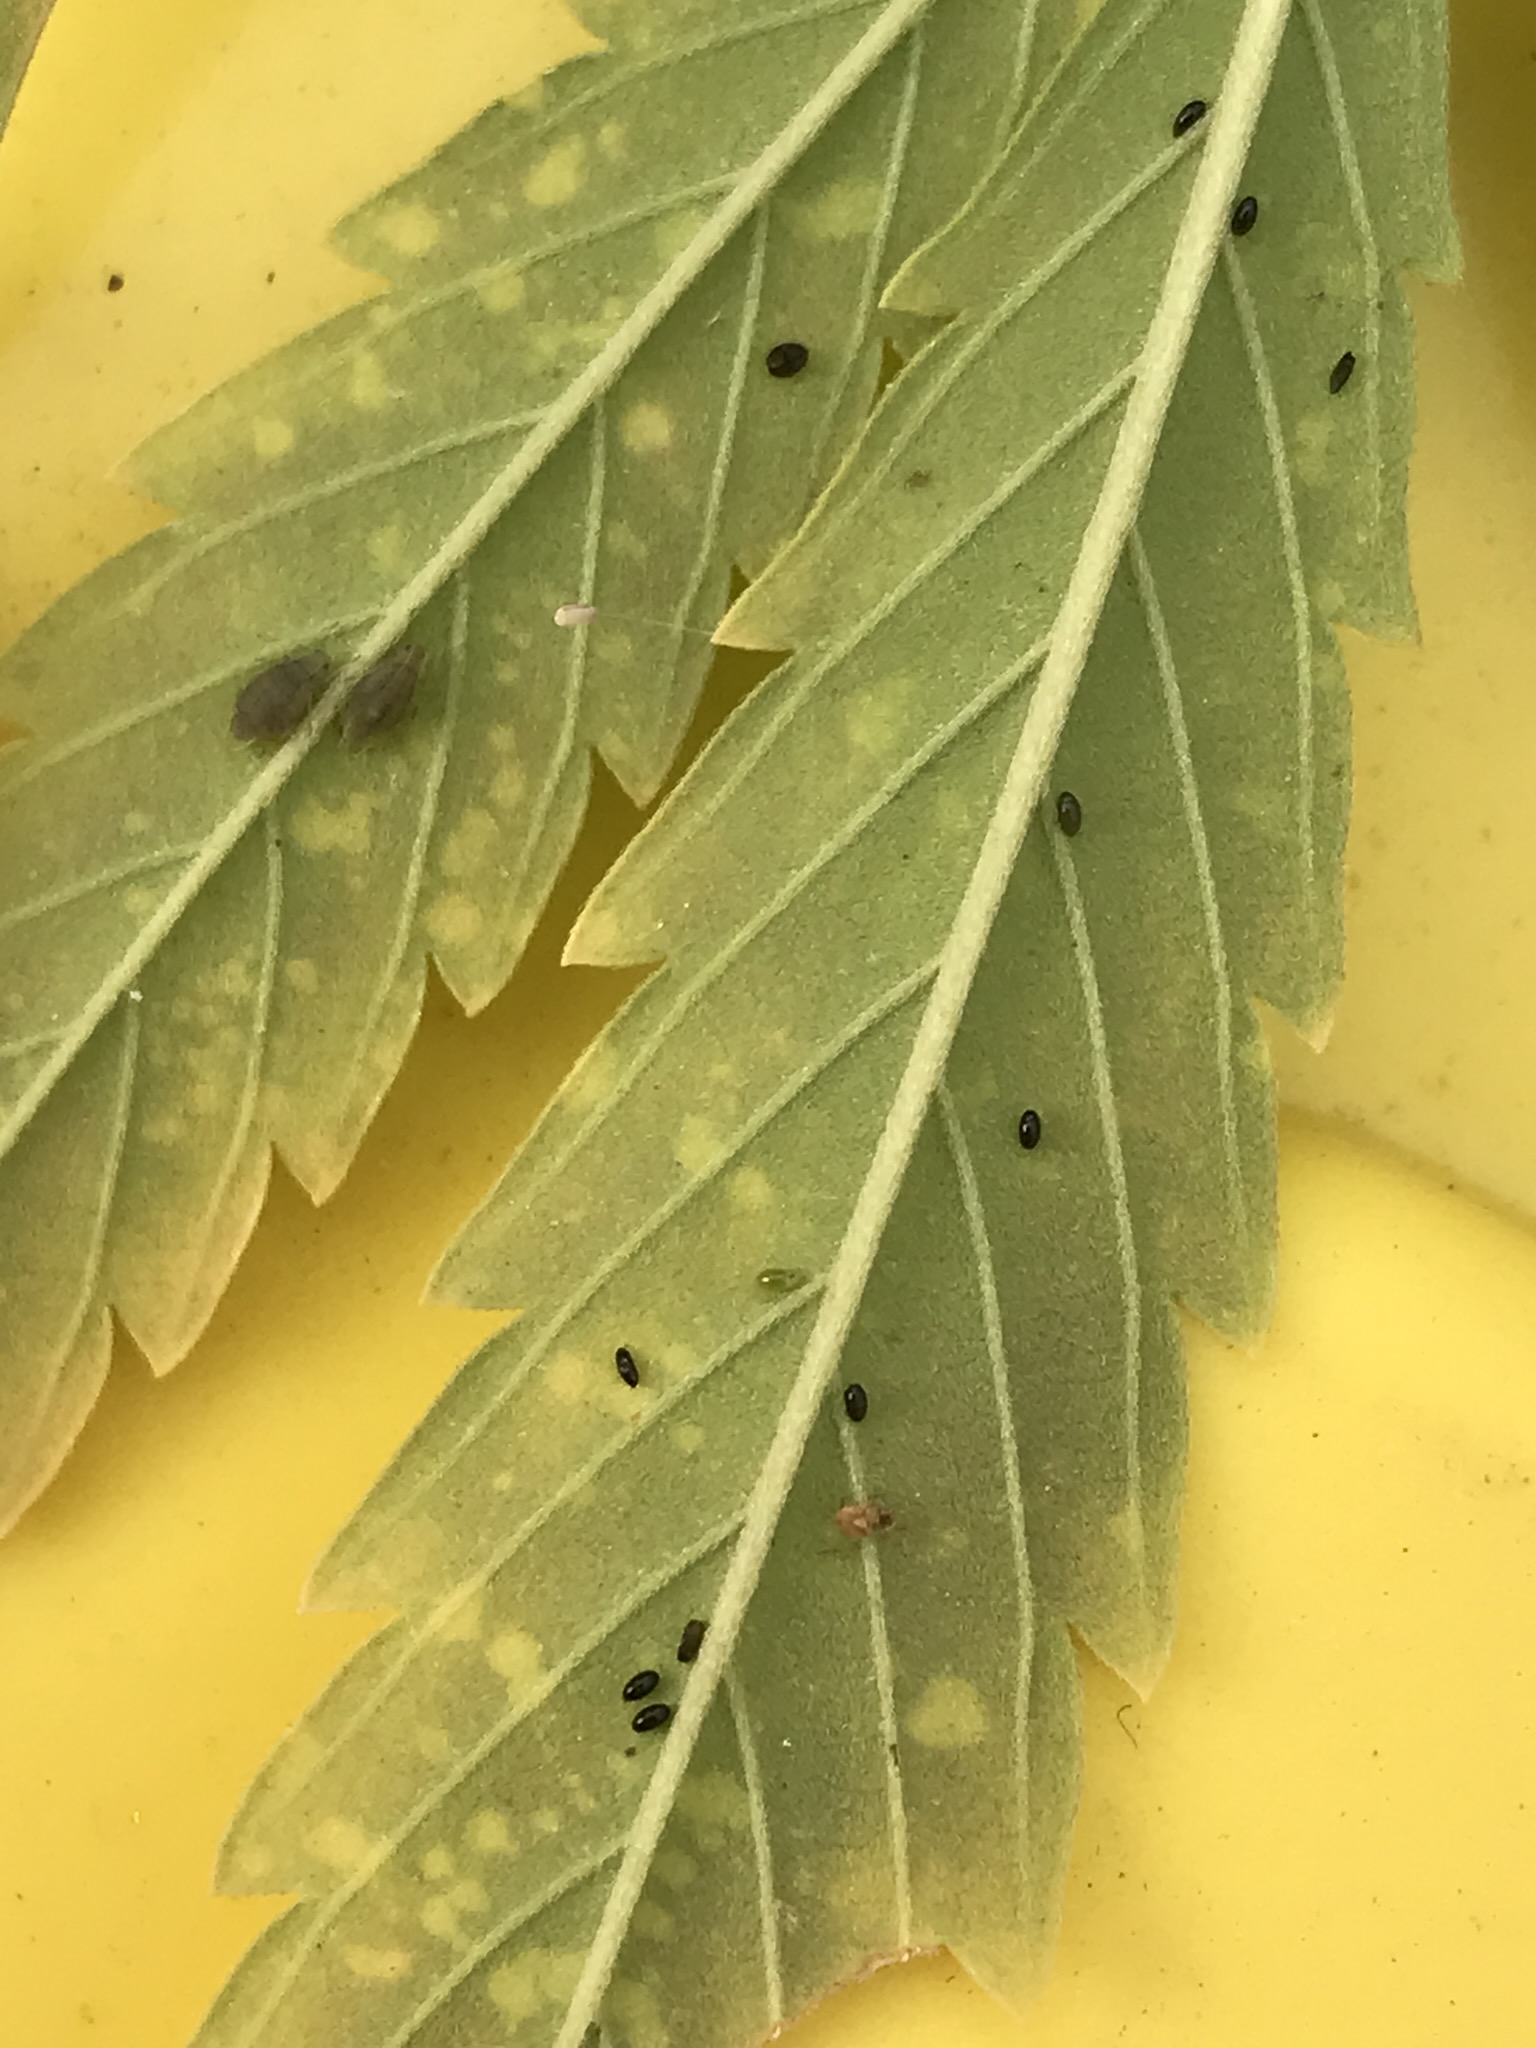
- Know your enemy! It can be tough to determine exactly what you are looking at when finding a culprit under your loupe glass. This is where the research comes in. Yep, you are also a freaking scientist! For common pests of cannabis check out www.growweedeasy.com. I have loved this site’s straightforward & easy to understand information for years. For more scientific information about the pests themselves, their life cycles & environmental controls, check out http://ipm.ucanr.edu/index.html. If anything, Google “common cannabis pests” & get a good idea of who they are & what they look like. Knowing exactly what you are up against will help you determine what natural measures are necessary to manage the specific pest. Knowing your enemy will help you adjust the environment accordingly & in preparation. For example, a few years ago I found a few spider mites on a plant at the end of a row. I felt like it was a zombie infestation & could barely even sleep, wanting nothing but to blast them all to hell…but I maintained control! I researched spider mites & learned that they love hot, dusty, dry conditions, so I adjusted the environment to make it more uncomfortable for them. I’d mist under the plant & up under the lower leaves EVERY morning, sometimes again later in the day, to rinse the undersides of the leaves & keep the humidity up. That really stalled them out. I also purchased some beneficial mites, specifically those that thrive in my hot weather conditions & love eating spider mites. Within a week I was in the clear. It was so cool & I didn’t have to kill off every living organism in sight to make it happen. Whew! Needless to say, I now mist up under my plants almost everyday when it is dry, hot & dusty & it keeps the little zombies at bay all season.
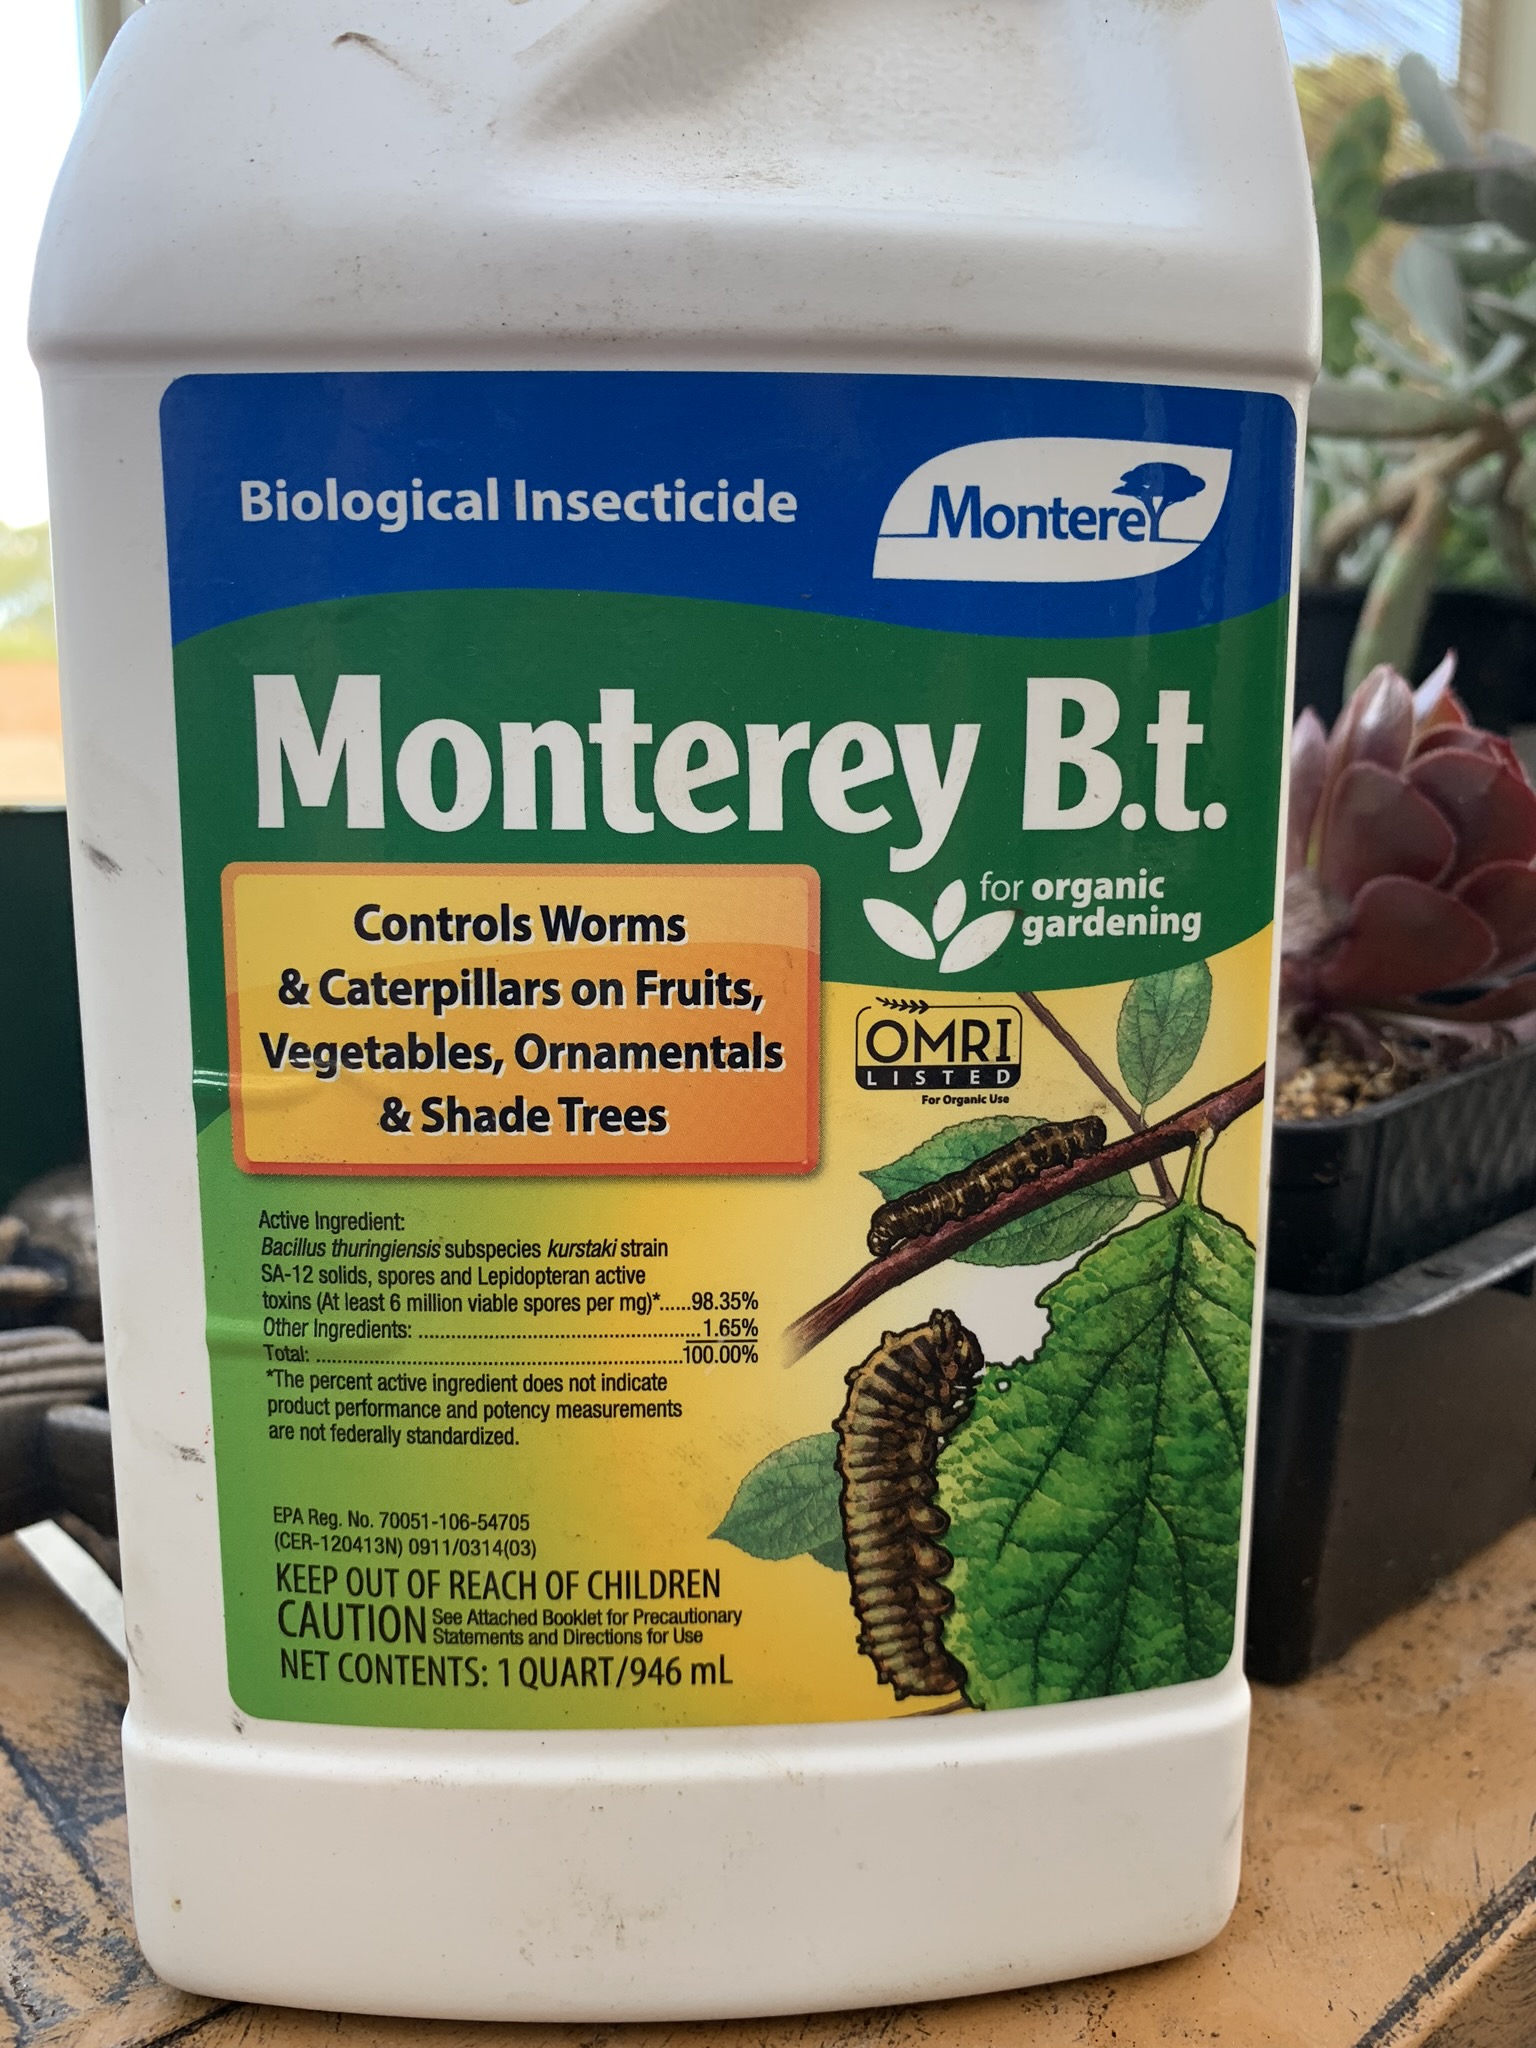
- Stock up on BT! Caterpillars – my one exception to spraying in flower explained.
First off, what is BT? BT, or bacillus thuringiensis, is a naturally occurring toxin used as an organic pesticide that ONLY affects caterpillars. It’s an organic spray with a quick break down period.
“Bt is a microbe naturally found in soil. It makes proteins that are toxic to immature insects (larvae). Bt makes toxins that target insect larvae when eaten. In the caterpillar’s gut, the toxins are activated. The activated toxin breaks down their gut, and the insects die of infection and starvation. Death can occur within a few hours or weeks.The different types of Bt create toxins that can only be activated by the target insect…”
– National Pesticide Information Center
Covering your plants with insect netting is an option to keep the moths from laying eggs on your flowers, but it doesn’t work well for me. You can spend hours each morning & evening picking them off – which I do, but sometimes I miss seeing the camouflaged little stinks. BT is inexpensive, super effective & has a quick break down period of a week or less. It can be sprayed often with no ill effects on the environment or the buds when sprayed at the right time of day, when they can easily dry out, at the right time in the flowering period. I find that spraying every two weeks is sufficient for me (3 times in the season) & I hold off on using anything at all during the last few weeks, going back to the pick off method to avoid overly wetting really dense buds, especially if the weather has become cool & moist. I do throw out a few flowers each year from caterpillar damage, but the loss is so minimal when prepared.
- Get to know your weather patterns during this phase of the season. If you have lived in the area you are growing in for many years, you likely have a good idea what changes occur within August to the end of October. Really think about it – When does it get cooler? When does it get rainy, or does it get really humid? Do areas of your garden lose sunshine with the transition of the season, leaving an area now cast longer in shade? If you are new to gardening your area, your specific climate & microclimates may pose some surprising challenges if you don’t plan ahead. Do some research to see what is typical weather for you during the weeks of flower. Depending on the strains you are growing, some may be harvested earlier while others will need to wait, making those late plants more susceptible to fall weather induced problems. One thing I do every year is keep a log. A journal, a calendar, whatever works best for you. I tend to do both. On my calendar I note when flowering begins & the anticipated harvest dates for each strain. These dates are not finite, especially given the lack of some information out there & obscure strains, but they give me an idea of what to prepare for. (Yep, you are also a meteorolgist!) I log the weather patterns from previous years & what I noticed, such as; When was it over 100 degrees? What insects were present during the season? Was there anything specific that posed an issue & why? How can it be avoided next year? Through my research, I can step ahead of disease, fungus or specific pests the weather caters to.

What I know from taking notes:
- I know that in August the days begin to get shorter. Slowly we will ease into September, with earlier dusk & nightfall which delays moisture evaporation in areas that would otherwise dry out quickly.
- I know that it tends to stay warm well through October, but more humid at times.
- I know that the caterpillars become an issue every single year when flowering begins, causing rotten “poop caves” in the buds.
- I know that we always have a storm. We have days when temperatures drop significantly. I have multiple years noted with rain & high winds within the first week or two in October! Better have support!
- I know that aphids tend to pop up in September & October. Some really like cooler temperatures & higher humidity. Be diligent in checking under leaves & up inside the canopy of each plant.
- I know that earlier sunsets cause some plants to be cast in more shade later in the day than usual. This, in addition to cooler temperatures, moisture in the air & terrible air circulation can cause powdery mildew to blossom. Time to trim up & clean out the inner/ lower canopy of each plant & add an outdoor fan in the area that needs better circulation. (I use an old, rotating stand fan with an extension cord, yes outside, no joke.)
- I know that any plant infected with botrytis (bud rot) will begin to show with added moisture in the environment.
To be continued….
Part 2 coming up next!
I know you are on the edge of your seat!!! In the short meantime, make sure your girls are supported, you have a nutrient plan in place (if needed) & your IPM awareness is ON! And, if you have any questions thus far or helpful hints to share, please hit me up at jennybee698@icloud.com or drop a comment here. Comments, feedback & topic suggestions are SOOO appreciated! Thank you for your support of The Garden Love!! 💚
*If you find that adjusting cultural controls & trying natural methods are just not getting the job done, you’ve tried everything to no avail & you’re ready for a heavy hitter lest you lose your entire crop, check the California Department of Agriculture for what is OK & what is NOT OK to use on cannabis. https://www.cdpr.ca.gov/docs/cannabis/questions.htm Confirm the exact pest you are treating for & be aware that some pesticides, while eradicating one pest, can alter your environment allowing another to thrive creating another problem!


Enjoyed your column very much. It was a wonderful read and very informative.
LikeLike
I am so glad! Thank you! I have more on the way. If you have any questions or topics pertaining to outdoor cannabis growing you’d like to learn more about, please let me know. Thanks for your support & enjoy your growing!
LikeLike
What is the ph of the water you use? I have my ladies in grow bags as well and they started showing little brown/rust spots with middle leaves yellowing and lookimg burnt? Was this a ph issue because I treated as such and did a flush and restored my nutrients at half strength phed to 6.5
LikeLike
Hello Steven! Sorry for the delay, I’ve been busy in the gardens! (And mumming, can’t escape the kiddos, lol) I apologize, for my answer is…. I don’t PH my water, lol! I know, I know, it’s something I may want to know… or do I? I’ve been using my local tap since the beginning, before I ever knew about the Ph or how to check it. When I thought about it, I decided that since everything was fine I didn’t want to add one more test, one more thing to “worry” about in my already full repertoire. This is not the case for everyone depending on their water sources & experiences, whether they are growing indoors or out, using synthetic nutrients, etc. I know cannabis specifically appreciates 6-7 Ph so you are right in that range with your correction. And yes, the browning rust spots can definitely be caused by an off Ph. It depends on where your water is initially coming from & what you are adding to it in feeding your ladies. Also, how often you are mixing something in to your water vs. watering with just plain water. I have a favorite website for these questions – please check out a mentor of mine at http://www.growweedeasy.com. Nebula covers ALL things Ph that may help you feel better about your next steps.
Thank you so much for reading!! I have another post coming soon about drying, curing & storing cannabis flower. It’s that special time of year!
Enjoy your growing!! Best, Jenny
LikeLike
Yeah, the “username” could be off-putting, you can just call me Tony in Elk Grove. Is that NorCal or ‘CentCal’ I wonder.. I appreciate your insight on supporting heavy branches with netting, I tend to use whatever is laying around the yard, bamboo, insulated wire, even saved branches from the Mulberry in the front-yard. I’m a relative neophyte when it comes to “a grow” having only maybe 25 seasons under my belt and always ready to learn something new. It’s a bit of a challenge growing from “bag-seed” and my own crossbreeds when it comes to what each of the girls might want in order to be happy and productive since they all have their own personality, but fingers crossed – It looks to be a good year, since I never buy herb. Or zucchinni, or pomegranates, or artichokes, and my sunflowers this year were beyond beautiful.
Glad you found your happy-place and decided to share.
Not looking forward to the arrival of those blasted aphids (grumble, grumble) but heard from someone who has a lot more time and energy and thought invested in organic gardening than I have and he’s of the mind that they will go after a plant overdosing on nitrogen, and I have a bag of organic granular seed-bed prep fertilizer that fits the bill.
Chemicals-Yech!
Happy Harvesting.
LikeLike